Intro
Intercepting HTTP proxies such as Burp Suite or mitmproxy are extremely helpful tools - not just for pentesting and security research but also for development, testing and exploring APIs. I actually find myself using Burp more for debugging and learning than for actual pentesting nowadays. It can be extremely helpful to look “under the hood” at actual HTTP requests being made to make sense of complex APIs or to test that one of my scripts or tools is working correctly.
The general use case for a tool like Burp or mitmproxy is to configure a browser to communicate through it, and there are plenty of write-ups and tutorials on how to configure Firefox, Chrome, etc to talk to Burp Suite and to trust the Burp self-signed Certificate Authority.
However, I often want/need to inspect traffic that comes from other tools besides browsers - most notably command line tools. A lot of CLI tools for popular services are just making HTTP requests, and being able to inspect and/or modify this traffic is really valuable. If a CLI tool is not working as expected and the error messages are unhelpful, the problem can become obvious as soon as you look at the actual HTTP requests and responses it’s making/receiving.
I have used these techniques to inspect popular CLI tools like the Azure CLI (az) and Zeit’s now utility. In the past, I have even proxied the CLI tools provided by a commercial security tool we used and learned about some undocumented APIs and behaviors that were not in their documentation. With this knowledge, I was able to automate certain things that were not possible through their vanilla CLI or the published API docs.
In this post, I want to show various techniques for configuring different CLI tools written in different languages to proxy their HTTP(S) traffic through Burp Suite - even if the tools themselves don’t offer easy proxy settings. In general there are two things we must configure:
- Make the CLI proxy traffic to Burp
- Make the CLI trust the Burp CA (or ignore trust)
The second step is often more difficult, but never impossible :)
In most of these examples, I have Burp Suite listening on localhost:8080 and am running the CLI tools from the same machine. If Burp is running on a different host or interface, you should be able to just replace localhost with the IP of Burp.
Example 1 - Proxying curl and wget
For the first example, I’ll show how to proxy the old standbys curl and wget. Both tools can easily be configured to point to a proxy and are “proxy aware”. They pick up their proxy settings from environment variables:
http_proxyhttps_proxy
You can either export the variables first, or run them inline with the command:
|
|
We will see the curl and wget requests in Burp:
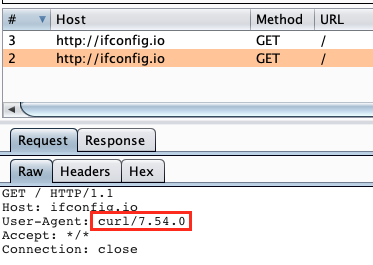
That works great because it’s just HTTP. What about HTTPS? If you try to run it out of the box, you will get failures:
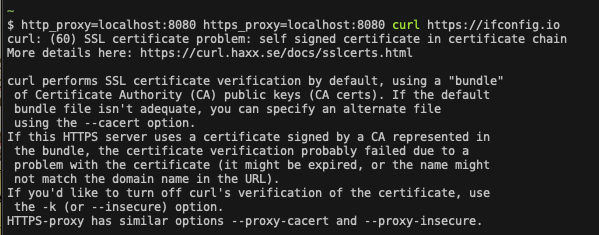
curl does not trust the certificate that Burp is presenting. However the error message is quite helpful. Most CLI tools will fallback to the operating system when deciding what certificates to trust. So we have two main options:
- Disable trust verification
- Configure our operating system to trust the Burp CA
The first option is easiest. For curl use -k or for wget use --no-check-certificate:
|
|
And you will see the HTTPS traffic in Burp.
Trusting the Proxy Certificate at the OS Level
For option 2, we have to export the Burp CA from within Burp. We can download the Burp Certificate in DER format to ~/certs. We’ll also convert it to PEM:
|
|
Note: if you are using mitmproxy, the certs are already in ~/.mitmproxy
Installing and trusting the certificate is very OS dependent.
Note: be aware of what this is doing. You are weakening the security of your OS. Consider the risk.
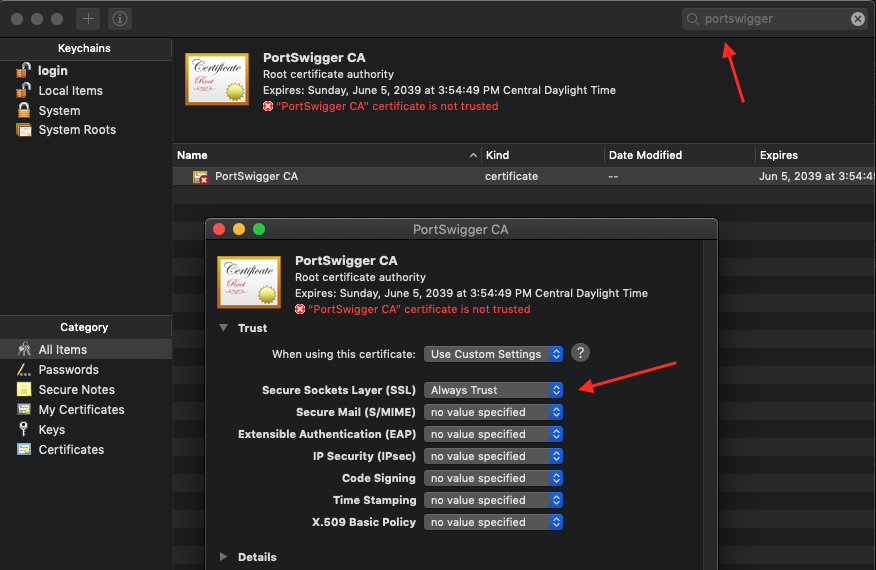
Mac OSX
On a Mac, just double click the downloaded DER file and OSX will prompt you to add the cert to the keychain. If you select “System” it will be trusted by all users on the machine. Then after importing it, you must trust it. Search the keychain for “PortSwigger” and open up the certificate. Under “Trust” select “Always Trust” for SSL:
Windows
On Windows, double-click on the DER file and select “Install Certificate”. Select the “Trusted Root Certification Authorities” certificate store to install and trust the Burp CA.

Linux
For most distros, trusted certificates are in /usr/share/ca-certificates. Copy the burpca.crt file to /usr/share/ca-certificates and then run:
|
|
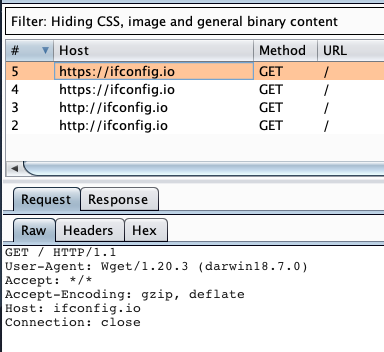
With the Burp CA trusted by your OS, you no longer have to use -k with curl or --no-check-certificates with wget and you will see HTTPS traffic in Burp:
Example 2 - Proxying Java JARs
While I would obviously prefer a Python or npm package or a Go binary - a lot of CLI tools I deal with are JARs, including all the CLI utilities for my company’s SAST solution. Now some of these utilities have proxy support out of the box that can be configured with command line options, however some of them don’t and I need to force the JAR to talk to my proxy.
A few years go, a security scanner my company was using at the time had a horribly documented API, and the only approved way to interact with it using API tokens was through their Java JAR CLI tool. We needed to scale our automation and wanted to write a Python package for talking with the API, so I used this exact technique to proxy their JAR and figure out how to authenticate with API tokens and what APIs we needed to hit.
I won’t pick on that security vendor here, so instead I will demo on a random Atlassian CLI tool I found for talking with Jira. For example, I can use this CLI to query the Jira version running on a random cloud hosted instance:
|
|
Let’s figure out how it’s doing that so I can recreate the API calls manually. Unfortunately, the CLI tool doesn’t have any options for specifying a proxy. Thankfully, it’s actually pretty straightforward to force the JVM to use a proxy through some properties when launching Java:
http.proxyHosthttp.proxyPorthttps.proxyHosthttps.proxyPorthttp.nonProxyHosts
To proxy a JAR through Burpsuite, we need to set the first 4 options to our proxy, and ensure the last one is blank. This will force Java to proxy all hosts through Burp. We do that by adding these as command line flags to the java command before we specify the JAR:
|
|
But we now get an SSL error!

Even though I have the Burp certificate trusted in my OS keychain, Java actually uses its own keystore. So we need to add the Burp certificate there also.
Adding certificates to Java Keystore
The default keystore is located in $JAVA_HOME/lib/security/cacerts. If the $JAVA_HOME environment variable isn’t set for you, you can also quickly find it by using java:
|
|
To add certificates to Java’s keystore, we utilize Java’s keytool utility, which is included at $JAVA_HOME/bin/keytool. To import our Burp certificate, we must import the PEM formatted file to the trusted CA certs:
|
|
This will prompt you for the keystore password. By default the value is changeit. Then specify “yes” to trust the certificate:

Now with the Burp certificate trusted by Java, we can run the same command and see the HTTP traffic in Burp:
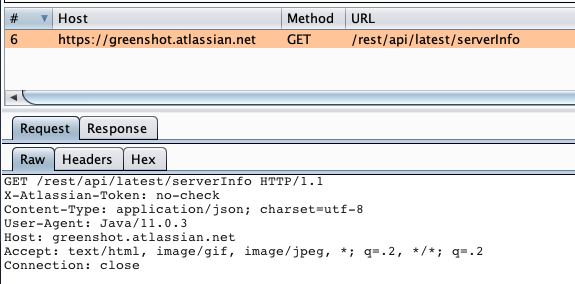
There it is! It makes a simple REST call to /rest/api/latest/serverinfo. Yes, this is publicly documented and I could have figured it out by RTFM but that’s not as fun :)
Example 3 - Proxying Python Requests
Moving along, this next example will focus on Python CLIs. Lately I’ve been using this a lot as I’ve doing quite a bit of Azure automation at work and wanted to peak under the hood of the official az CLI. In this example though, I’ve already installed the Azure CLI using homebrew (brew install azurecli) and done an az login.
I can view my available resource groups with:
|
|
Let’s intercept this request to figure out the call(s) it’s making.
Fortunately, Python will try to honor the “normal” proxy environment variables. However trying to set that results in…the typical SSL error:
|
|
Since I have the Burp CA trusted by my OS, Python is not using it.
Adding Certificates to Python
Python’s CA handling is a little strange. Most Python CLI’s probably use the requests library, which uses it’s own CA bundle, and then will also look at the CA bundle included with another library called certifi, which uses Mozilla’s bundle. To trust our CA, we can add it to the Mozilla bundle included with certifi.
It’s important to note that each Python interpreter get’s its own - so if you are using virtual environments you need to make sure you run the following commands with the correct Python.
First, I want to verify how az calls Python and which version it is using:
|
|
So az is calling its own embedded Python interpreter that was installed with homebrew at /usr/local/Cellar/azure-cli/2.0.74/libexec/bin/python.
First, to identify where the certificates are loaded from we import certifi and run certifi.where()
|
|
That cacert.pem file is a list of all trusted CAs in PEM format. To add our Burp CA, we can just append the PEM to the file:
|
|
With the Burp CA added to the Mozilla bundle, we can now proxy the az command!
|
|
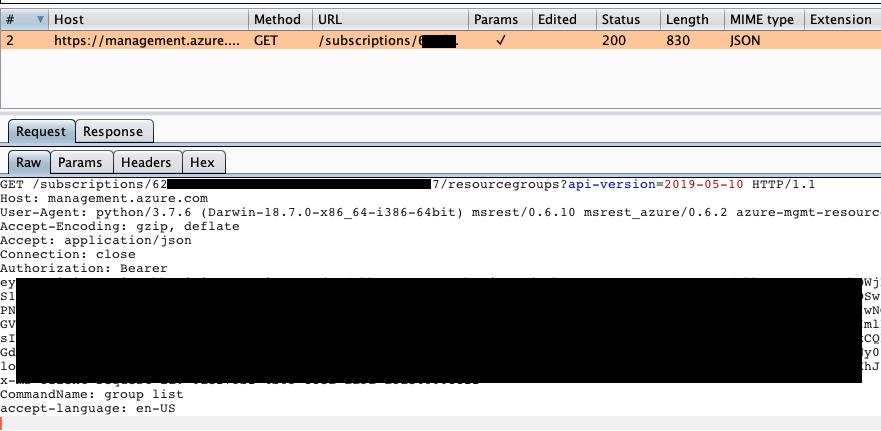
And now any other az command we want to run we can start viewing/tampering with. This has been a lifesaver for me to see “real world” examples of Azure’s API I can recreate in my automation scripts.
Example 4 - Proxying Node JS
In this example, I wanted to be able to proxy the traffic that comes from the now NPM package for interacting with https://zeit.co/. I have already installed the tool with
|
|
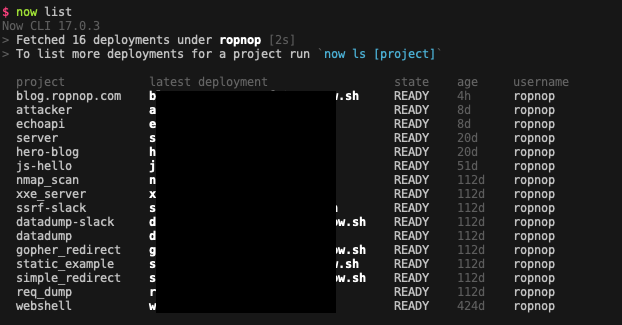
After logging in, I can view my current deployments with:
Unfortunately, it appears that Node does not honor the proxy environment variables. Running:
|
|
returns the data as expected, with nothing appearing in Burp. Unfortunately, Node does not support a global proxy setting, and there has been long discussions about it. But that doesn’t mean we can’t force one.
First, let’s see what the now command is calling:
|
|
The now utility is one large, ugly, minified JS file located in Node’s bin directory with a node shebang. We can also run the same now command by calling that file with node directly:
|
|
While node does not have global proxy support, this is an awesome project called global-agent which will set up a configurable proxy in a Node project by simply importing it. To use it, we use npm to install it into our current directory.
|
|
Note: you must be on Node 12 or higher
The module uses the GLOBAL_AGENT_HTTP_PROXY environment variable, so we must export that first. Now from within that directory (because it’s where node_modules is) we can inject the new requirement into the now package:
|
|
Node forces the now client to import global-agent/bootstrap which runs automatically. Now the now command will proxy requests to the URL set in the environment variable.
Now to add the SSL certificate for Burp.
Adding Certificates to Node
This is actually quite a bit easier than Python. The Node command understands an environment variable called NODE_EXTRA_CA_CERTS. To load our Burp certificate as trusted, we just export that environment variable as well and point it to the PEM file from Burp:
|
|
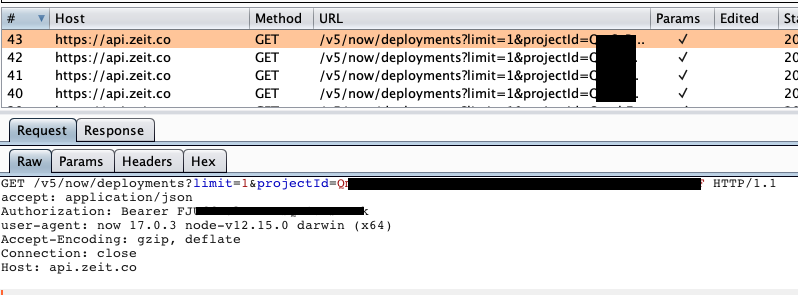
And it now works! We can view the traffic from the now package in Burp:
Example 5 - Proxying Go Binaries
It is becoming increasingly popular for developers to distribute CLIs as static Go binaries. This is, of course, awesome because Go is awesome. It’s also awesome because proxying Go is actually very easy since out of the box every Go program understands the environment variables http_proxy and https_proxy.
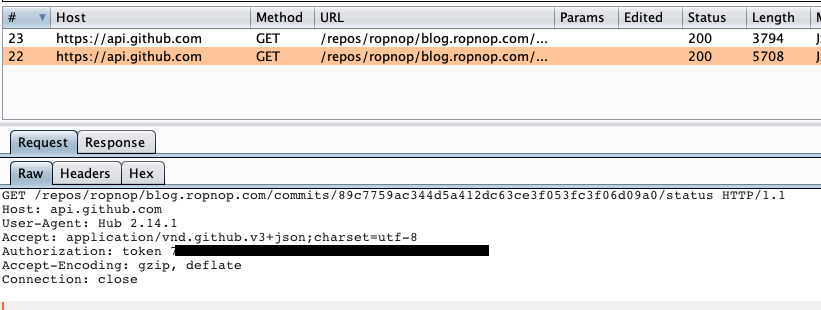
For this example, I’ll proxy Github’s hub utility. With hub downloaded and installed, in a Git repo I can check on my current CI status like this:
|
|
Since hub is a Go binary, I simply need to set the environment variable for the proxy:
|
|
And we get an SSL error.
Trusting Certificates with Go
Unfortunately, Go doesn’t have a convenient place to trust an additional CA certificate. For each platform, Go looks in OS dependent places for trusted CAs. You can view these in the source code:
This is where you have to add the Burp certificate to your system keychain (as outlined above). After that, Go will pick it up and you can proxy Go binaries just fine:
|
|
Conclusion
Hopefully you find this as helpful as I do. Whether you are pentesting an app or CLI, or just developing and wanting to debug - intercepting HTTP traffic is really valuable. I love when I can apply some of my pentesting skills to increase development velocity and be creative.
Python, Node and Go encompass the vast majority of CLI tools I use, but of course there are others. In a future post, I’ll cover how to force an invisible proxy onto a process that is not proxy aware at all through layer 3 redirection.
Let me know if you have any questions or other ideas I missed!
-ropnop
tl;dr
|
|