This is the third part of a series showing how to remotely execute commands (and “own”) Windows machines once you have compromised a set of credentials.
In Part 1 I showed some of my favorite tools and techniques for popping shells from Kali Linux. I used Metasploit, CrackMapExec, winexe, and some of the included scripts with the Impacket library to get interactive and semi-interactive shells on Windows machines once I knew a valid domain user’s credentials.
In Part 2 I revisited some of the same techniques in Part 1, but performed all the attacks from a Windows machine. I used runas to get a Kerberos TGT for the compromised account and used the built in net commands to explore the domain. Then I used psexec and remote services to get shells and command execution on the target Windows box.
In this post, I’m also going to be working from a Windows attack box, but will be utilizing the Windows command line and PowerShell to execute commands via Windows Management Instrumentation (WMI) and Windows Remote Management (WinRM).
WMI
Windows Management Instrumentation (WMI) is the infrastructure for management data and operations on Windows-based operating systems.
WMI is an incredibly powerful feature that allows remote querying and administration of Windows devices. Think of it like SNMP for Windows infrastructure. Just like all of Microsoft’s administrative tools and features, though, it didn’t take long for attackers to realize the amazing potential for using and abusing WMI.
Querying with WMI
Before I jump in to spawning processes and getting command execution via WMI, it’s useful to see what else WMI can be used for. From an attacker’s perspective, WMI can be very valuable in enumerating sensitive information about a system or the domain.
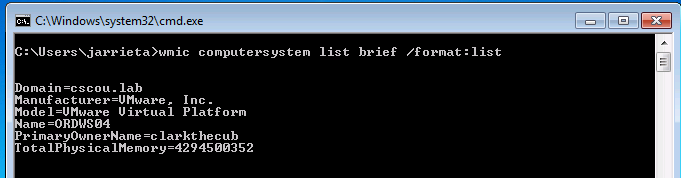
From Windows, wmic is the command line interface for querying WMI. Simply typing wmic will drop you into an interactive command prompt where you can query information about the system via WMI. Issuing a /? will list all the aliases and commands you can run via wmic. You can also issue queries directly from the command line as well.
Note: When working from the command prompt, it’s useful to append “list brief” or “list full” for easy to read output. You can also append “/format:list” in the command line
For example, here I am on a local Windows machine (say I got a shell somehow else) and dumping information about the system:
Here’s a list of useful aliases for enumerating information about the system, process, domain, users and groups:
|
|
For more useful commands, see this Technet article.
Remote WMI Querying
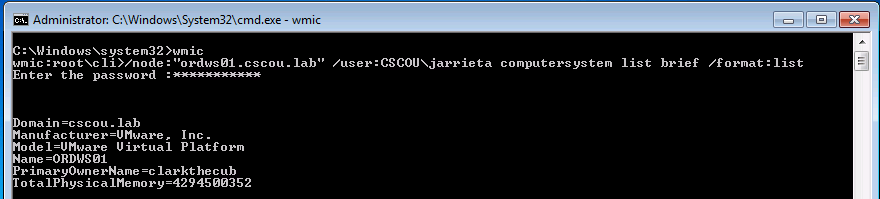
Now we get to the fun part. Querying information about the local system is great, but it’s not really useful for sysadmins…or attackers. wmic can be used to query remote systems as well. The command takes the switches /node and /user to specify which host to query and what credentials to authenticate with.
Back on our Windows attack box, we can query a domain joined computer for sensitive information using our compromised domain credentials:
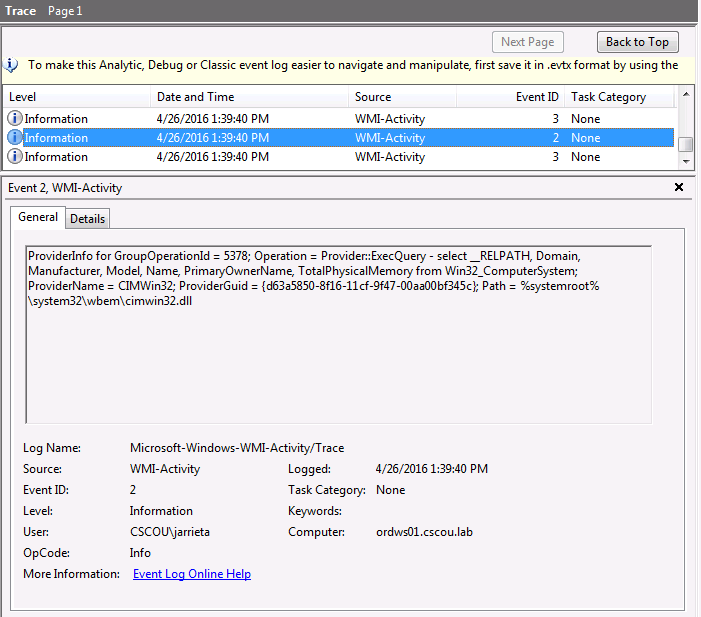
Note that we are not starting a service or executing a normal command on the target system that can be logged, or even opening a persistent connection that can be detected. In fact, logging for WMI events is disabled by default, and have to be explicitly turned on. Once that’s enabled, you can finally see the exact WMI query that was run:
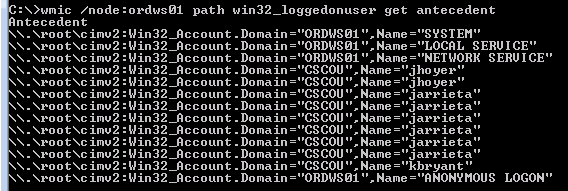
All of the above mentioned aliases can be used remotely. You can also interact with classes directly with the ‘path’ option. For example, here’s a very stealthy way to discover local admins on a remote machine (note that domain is the computer name):
|
|

Note: I ran wmic from a command prompt as jarrieta, hence I didn’t need to specify /user
Another useful oneliner is to see who is logged on to a machine (for when you’re hunting admins):
|
|
wmic can even read nodes from a text file and execute the command on all of them. If you have a text file of workstations:
|
|
The above examples barely scratch the surface of what WMI is capable of. Not only can you query for all sorts of information, you also have the ability to modify settings and create new objects. For example, you can even change user’s passwords via WMI.
Fortunately, a lot of really smart people have wrapped up the best features of WMI for attackers into extremely useful PowerShell scripts. These types of queries are at the heart of a lot of the reconnaissance tools you see included in frameworks like Nishang and PowerSploit.
WMI Process Create
Now we get to one of the “best” features of WMI - the fact that it can be used to remotely execute code!
The Win32_Process class can be called via WMI to query, modify, terminate, and create running processes.
As a quick example, here’s a command to launch “calc.exe” on a local machine via a WMI statement:
The command returns the ProcessID and the ReturnValue (0 meaning no errors)
By specifying /node it’s incredibly easy to remotely create processes and execute commands. In the last post I demonstrated launching Meterpreter from an sc create command with Metasploit’s web_delivery module. To switch it up, let’s launch a PowerShell Empire agent this time. First, generate the command string to execute using the “launcher” stager in Empire:
|
|
And now from Windows, we’ll remotely create a process over WMI to execute that string:
|
|
We see it executed successfully (ReturnValue = 0). And a second later our Empire listener catches it. Note the process ID is the same as WMI returned:

On the victim machine, no window opened, no binary was dropped, no service was created, and unless the machine is configured to log WMI-Activity, no easily traceable log was left behind. Sexy.
This is the same technique that the Kali tools “wmiexec.py”, “wmis” and CrackMapExec use.
WinRM
Windows Remote Management (WinRM) is a Microsoft protocol that allows remote management of Windows machines over HTTP(S) using SOAP. On the backend it’s utilizing WMI, so you can think of it as an HTTP based API for WMI.
I’m not going to spend too much time discussing it because I’ve honestly never seen it in use at a client and therefore haven’t really exploited it, but I have played around with it in my lab. It’s good to at least be familiar in case I come across it.
If WinRM is enabled on the machine, it’s trivial to remotely administer the machine from PowerShell. In fact, you can just drop in to a remote PowerShell session on the machine (as if you were using SSH!)
The easiest way to detect whether WinRM is available is by seeing if the port is opened. WinRM will listen on one of two ports:
- 5985/tcp (HTTP)
- 5986/tcp (HTTPS)
If one of these ports is open, WinRM is configured and you can try entering a remote session.
Initiating WinRM Session.
We first have to configure our attack machine to work with WinRM as well. We need to enable it and add any “victims” as trusted hosts. From an elevated PowerShell prompt, run the following two commands:
|
|
This adds a wildcard to the trustedhosts setting. Be wary of what that entails. Note: I also had to change the network type on my attack machine from “Public” to “Work” network. YMMV
Once the attack machine is configured, use the Test-WSMan function to test whether the target is configured for WinRM. You should see some information returned about the protocol version and wsmid:
In this case we see that “ordws01” is configured, but “ordws04” is not.
Now we can use PowerShell’s Invoke-Command to remotely execute a command on the target over WinRM. To remotely run ipconfig and see the output:
|
|
Or, if you want to drop right into an interactive PowerShell session, use the Enter-PSSession function:

Forcing WinRM Open. If you really want to use PS Remoting and WinRM but the target isn’t configured for it, you could “force” it on through a single command. I wouldn’t recommend this but if you really wanted to use WinRM or PSRemoting than by all means do it this way. For example, using PSExec:
|
|
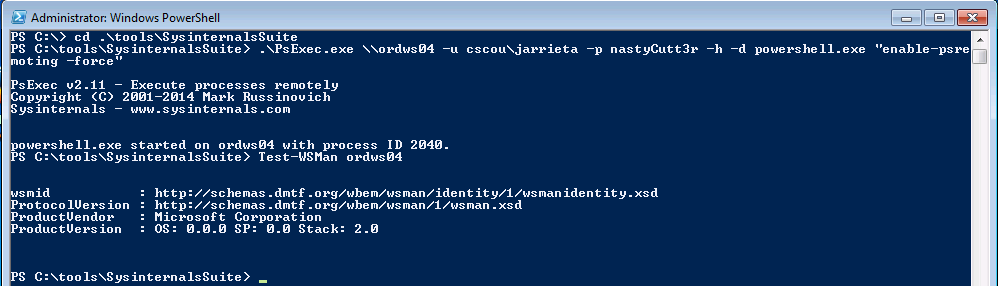
Now we can enter a remote PS session on ordws04 (we saw earlier that it was disabled).
Summary
Microsoft has implemented a lot of really useful features for sys admins to be able to remotely manage Windows environments. Unfortunately, every one of those tools and techniques can be used and abused by malicious actors or pentesters.
Tools like Metasploit, CrackMapExec, and Impacket are incredibly powerful and make a pentesters job so much easier by almost making exploitation point-and-click (or whatever the CLI equivalent is - type and click?). But it’s easy to rely on these tools too much, and without knowledge of how they work or how to manually re-create their techniques, a pentester without access to them won’t be able to do much.
In Part 1 I explained some of the quickest and most reliable ways to execute commands on Windows hosts from Kali linux once you have credentials. In Parts 2 and 3 I manually exercised the same techniques from Windows to demonstrate how they actually work. I won’t stop using the tools (they’re too damn awesome!) but now I, and hopefully you, know what to try if they don’t work or aren’t available.
Hope you enjoyed the series. Let me know if I missed anything or if my limited, simplified explanations of anything were wrong. Look for future posts about using these tools and techniques without passwords. PTH and Kerberos ftw!
-ropnop