In Part 1, I listed some common tools and techniques to use domain credentials to execute commands on Windows machines from Kali linux. In this post, I’m going to delve a little bit into how those tools actually work by re-creating the techniques from a Windows machine.
All of the tools mentioned in the previous post (psexec, wmiexec, etc) are essentially re-implementations of core Windows functionality, and every technique can be used natively from within Windows.
In this post I’m gonna explore the popular “PsExec” method (used in both Metasploit and Impacket). A lot of pentesters (myself included) have used the psexec techniques extensively, but until recently I never fully understood what was going on under the hood. Hopefully this post will shed some light on PsExec by manually re-creating the technique using native Windows tools.
In this scenario, I have a Windows 7 machine (named ‘win7attack’) connected to the same internal network as the CSCOU.LAB domain. It is not domain joined, it just sits on the same network. And as a reminder, we have recovered or cracked a single domain user’s account:
- User: jarrieta@cscou.lab
- Pass: nastyCutt3r
Testing Credentials and Exploring the Domain
In the previous post, I used Metasploit’s smb_login and CrackMapExec to test credentials on Windows machines and to see if the compromised account was a local Administrator on any of the machines.
There’s a few ways you can test credentials against a machine from Windows, but for demonstration purposes I’m gonna use the basic net commands. This isn’t the best or stealthiest way to do it, but it’s easy to follow and understand.
SMB Login
An easy way to test credentials is to try to initiate an SMB connection to the machine. This is essentially what Metasploit’s module does. In Windows, you can utilize the net use command with credentials to establish an SMB connection with a host:

We can see it completes successfully, so the credentials are good. To see if we are an admin, let’s try to view one of the admin shares (“C$”, or “ADMIN$”):
If we weren’t an admin, we’d see an access denied:

We can see which connections we have open by issuing a net use command:
Now one of the problems with this technique is we have established connections with the Windows hosts that can be detected. If an administrator on ordws01 ran a net session command, he or she would see a connection open from our attacking box:
From our attack box, we can terminate all sessions with net use /delete *
The other problem is that we can’t use all the net commands and other Windows tools by passing a username and password. For example, net view doesn’t have a ‘/user’ option and instead defaults to using your local logon. But we can bypass that limitation.
Using ‘runas’ to get Kerberos auth
The Windows runas command let’s us execute commands in the context of another user. When used with the ‘/netonly’ option, we can authenticate as a domain user, even though we’re not on a domain joined machine.
We can launch an interactive command prompt by running “cmd.exe” with runas. The beauty of this technique is that our LogonId changes, and we can actually start using Kerberos auth on the domain. Note how the whoami output is the same but our LogonId changes in the new command prompt after doing a runas:
In this new command prompt, we don’t need to run the net use command to open connections with specified credentials. We can just use normal commands the Windows will use our LogonId with Kerberos authentication:
We can verify that it used Kerberos authentication by running klist again and noting the principal name for the TGT, “jarrieta@cscou.lab”:
From this command prompt we are essentially “on the domain” and can start running native Windows commands with the privileges of jarrieta.
PSExec
In the last post, I used Metasploit’s “psexec” module and Impacket’s “psexec.py” to launch remote commands against a Windows machine with credentials. Both of these tools are based on a classic Windows utility named, shockingly, psexec.
From the TechNet article:
PsExec is a light-weight telnet-replacement that lets you execute processes on other systems, complete with full interactivity for console applications, without having to manually install client software
It’s a standalone binary that’s included in the Sysinternals suite. You can pass credentials to it and remotely execute commands or drop into an interactive command prompt:

If you run it from the “runas” command prompt which has a Kerberos TGT, you don’t even need to specify credentials.
When you start PsExec, you may notice a status line saying:
|
|
This might clue you in a little bit as to how PsExec actually operates. What it’s doing is remotely starting a service on the target machine (called “PSEXECSVC”). In fact, if we go on the target machine and view services while the command prompt is open, we can see it:
The service starts the binary C:\Windows\PSEXECSVC.exe. That directory is actually the ADMIN$ share over SMB. So PsExec performs a few steps to get you a shell:
- Copy a binary to the ADMIN$ share over SMB
- Create a service on the remote maching pointing to the binary
- Remotely start the service
- When exited, stop the service and delete the binary
This is precisely how the Metasploit module and the Impacket script operate as well. We can also manually recreate the steps to remotely start any other binary of our choice (e.g. a meterpreter payload).
Manually PsExec’ing
First let’s assume we have a payload executable we generated with msfvenom and obfuscated with Veil (so AV doesn’t flag it). In this case, I created a meterpreter reverse_http payload and called it ‘met8888.exe’
Copy the binary. From our “jarrieta” command prompt, simply copy the binary to the ADMIN$. Really though, it could be copied and hidden anywhere on the filesystem.
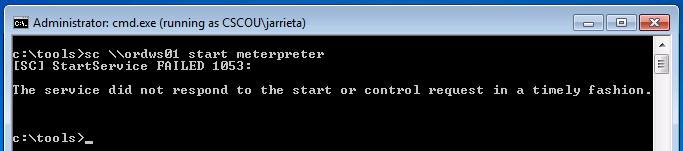
Create a service. The Windows sc command is used to query, create, delete, etc Windows services and can be used remotely. Read more about it here. From our command prompt, we’ll remotely create a service called “meterpreter” that points to our uploaded binary:

Start the service. The last step is to start the service and execute the binary. Note: when the service starts it will “time-out” and generate an error. That’s because our meterpreter binary isn’t an actual service binary and won’t return the expected response code. That’s fine because we just need it to execute once to fire:
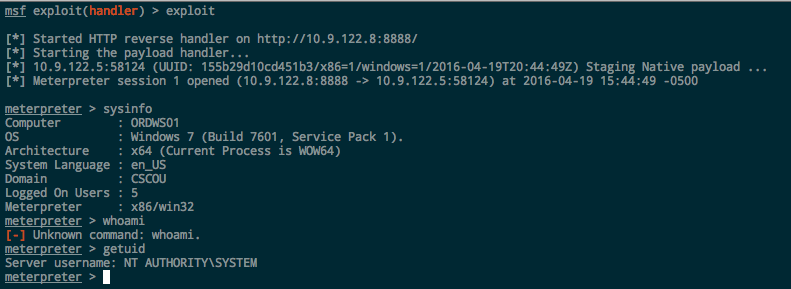
If we look at our Metasploit listener, we’ll see the session has been opened:
Cleanup our mess. After getting the meterpreter session, I’d migrate out of the met8888.exe process and into a more permanent one. Then we need to delete the binary and stop/delete the remote service:

One thing an astute reader might have noticed is that when we ran the normal PsExec binary and executed whoami in the shell, we were running as “cscou\jarrieta”. But in meterpreter running getuid shows us as “NT AUTHORITY\SYSTEM”. Why the sudden privilege escalation?
It has to do with how services are created and started. By default, services are created and ran as SYSTEM. When we created the service, we didn’t specify a username for it to run as so it defaulted to SYSTEM. If we really wanted to run the service with different credentials, we could have specified when we created it, but if we can just jump to straight to SYSTEM why would we want to? Conversely, we could have specified the “-s” option with PsExec to get a SYSTEM shell too.
SMBExec
One of the Impacket tools I used last past to get a semi-interactive shell is “smbexec.py”. This makes use of a really clever technique to execute commands and get output through SMB without needing to drop a binary on the system. Let’s see what happens when smbexec runs by looking at it from the target’s side. Obviously we could look at the source code, but this is more fun. As a reminder, let’s see what smbexec looks like when it’s fired up:

So we know it creates a service “BTOBTO”. But that service isn’t present on the target machine when we do an sc query. The system logs reveal a clue to what happened:
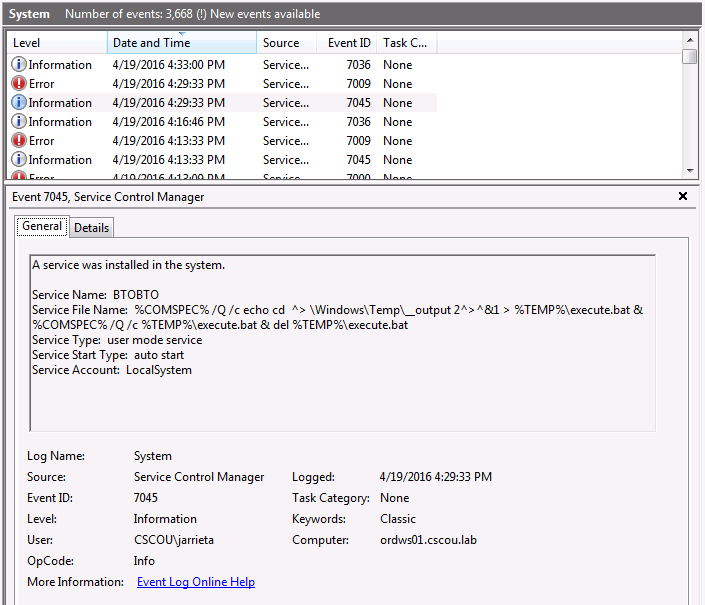
The Service File Name contains a command string to execute (%COMSPEC% points to the absolute path of cmd.exe). It echos the command to be executed to a bat file, redirects the stdout and stderr to a Temp file, then executes the bat file and deletes it. Back on Kali, the Python script then pulls the output file via SMB and displays the contents in our “pseudo-shell”. For every command we type into our “shell”, a new service is created and the process is repeated. This is why it doesn’t need to drop a binary, it just executes each desired command as a new service. Definitely more stealthy, but as we saw, an event log is created for every command executed. Still a very clever way to get a non-interactive “shell”!
Executing commands via services
As smbexec demonstrated, it’s possible to execute commands directly from service binPaths instead of needing a binary. This can be a useful trick to keep in your back pocket if you need to just execute one arbitrary command on a target Windows machine. As a quick example, let’s get a Meterpreter shell using a remote service without a binary.
We’ll use Metasploit’s web_delivery module and choose a PowerShell target with a reverse Meterpreter payload. The listener is set up and it tells us the command to execute on the target machine:
|
|
From our Windows attack box, we create a remote service (“metpsh”) and set the binPath to execute cmd.exe with our payload:

And then start it:

It errors out because our service doesn’t respond, but if we look at our Metasploit listener we see that the callback was made and the payload executed:

And we just launched a meterpreter payload remotely through a Windows service without dropping a binary.
Which, by the way, is nothing revolutionary. This is exactly how Metasploit tries to execute payloads through the psexec module now. The default behavior when using the module is to check to see if PowerShell is available and then create a service calling PowerShell from %COMSPEC%. Only if PowerShell is not available or you manually specify it will Metasploit actually drop a binary on the target systems now (which is good, since most AV detects Metasploit binaries now).
Coming Up
In this post I walked through how Windows services can be used to remotely execute commands when you have credentials. Hopefully this exposed some of the “magic” behind Metasploit’s psexec module and Impacket’s psexec and smbexec scripts. If you’re ever on a pentest and don’t have access to Kali, now you know how to use native Windows tools to replicate some of the behavior.
Next up, I’ll go into using Windows Management Instrumentation (WMI) and Windows Remote Management (WinRM) to also achieve authenticated RCE on Windows boxes (the technique behind wmiexec.py).
Hope this helped someone. Writing it and exploring these tools certainly helped me. Feel free to comment with questions or tell me where I’m wrong.
-ropnop