Background
A few weekends ago, I decided (because apparently I’m a masochist) that I was tired of the free version of ESXi running my home lab and decided to give Microsoft’s Hyper-V Server 2016 a try.
I liked the idea that it was light weight, accessible with PowerShell, and there were lots of cool Github projects that made deploying test AD domains automatic.
I had played around with Hyper-V on my Windows laptop, and liked the GUI Hyper-V manager as well. If I could remotely manage my lab with that and PowerShell, I’d be happy.
Installing Hyper-V server from the ISO was easy, but little did I know I’d burn several days just trying to connect to it.
I followed the steps in these docs, but still never got it working:
The crux of my problem is that Hyper-V Server is really intended to be run in an AD Domain environment. Remotely managing via PowerShell or the Hyper-V Manager I’m sure works seamlessly if AD is behind it handling authentication and authorization.
I don’t have an AD Domain set up in my apartment, and had little desire to spin up a DC and manage a domain for personal use. So I set about trying to configure Hyper-V to play nice with a WORKGROUP. What I wanted to do was be able to remotely connect to and manage the server from my main Windows workstation. I also wanted to do the bare minimum amount of tweaking to my main workstation (i.e. not doing anything blatantly insecure like disabling firewalls, trusting wildcards, etc)
Below are the commands I found that work to get remote connections working.
Configuring the Server
After initial installation, and setting an Administrator password, you’re presented with this minimalist screen:
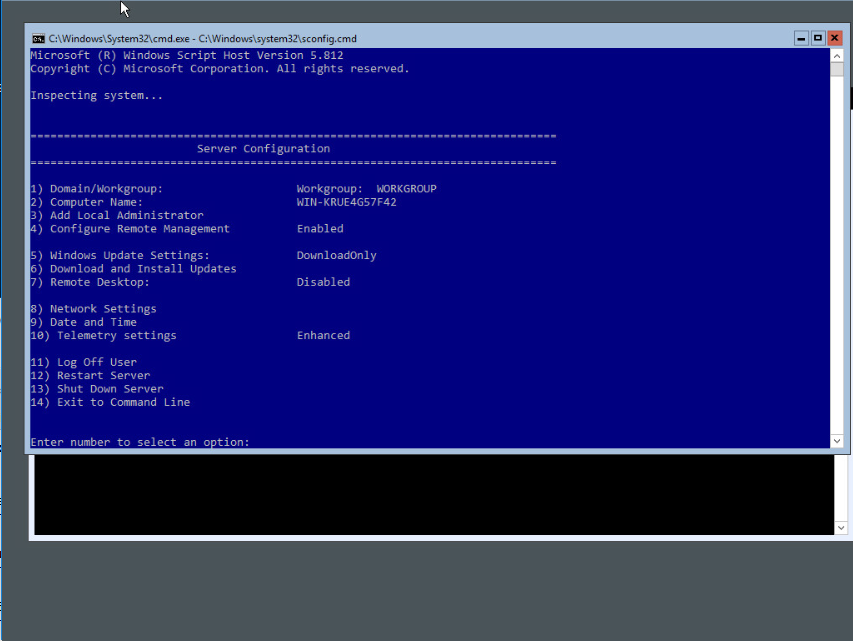
There’s a few things that need to be configured from here.
-
In “Configure Remote Management”, make sure Remote Management is enabled and change the setting to allow the server to be pinged
-
Enable Remote Desktop so you can remotely manage the server over RDP
-
Configuring a name. I chose
hyperv-server. This requires a reboot.
I also created a host entry for hyperv-server.home.local in my local DNS server so I could access it by hostname. Manually editing the etc\hosts file would work as well.
After these settings, I was able to RDP into the box by its hostname and using the credentials for HYPERV-SERVER\Administrator.
Server PowerShell Configuration
Behind the configuration menu is a command prompt, which lets you drop into PowerShell. From here, you need to configure the server to allow PS-Remoting and to allow CredSSP authentication to the server. Use the following commands:
|
|
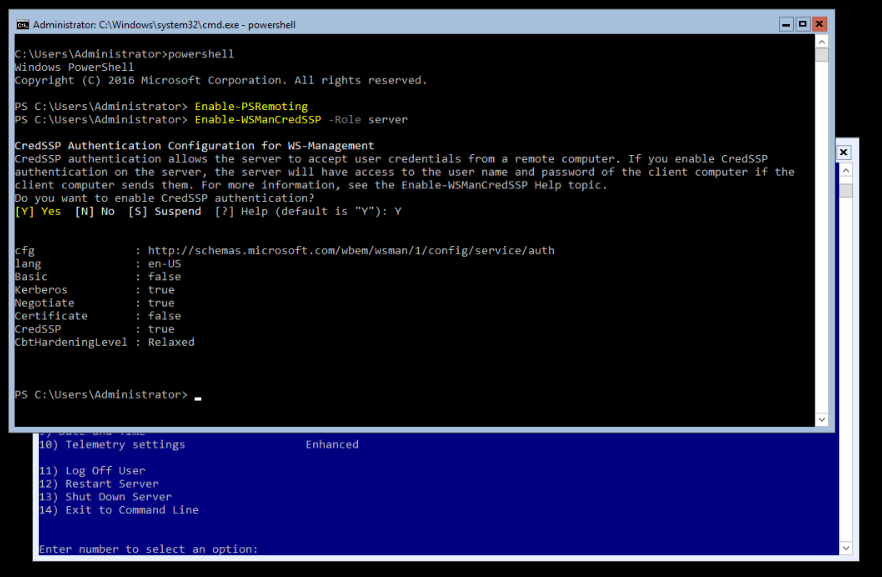
Once that’s enabled, you’re done configuring the server. Now came the tricky part of getting my client to communicate with it.
Client Configuration
I would be remotely managing the Hyper-V Server from my Windows 10 laptop. The first thing is to make sure that the connection profile is set to “Private” so that Windows Firewall allows the traffic (i.e. it won’t work over a public network)
|
|
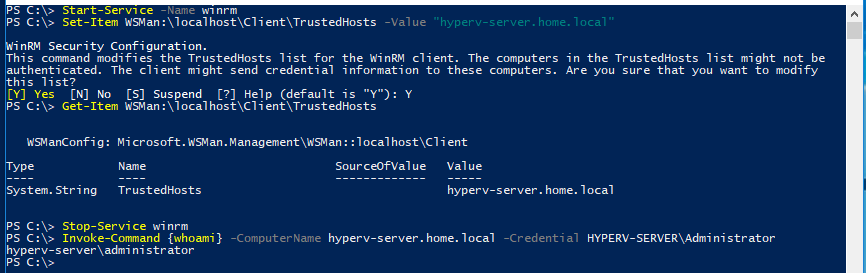
The next step is to configure the client that it’s okay to connect to the server by adding the server as a trusted host for the WS-Management Protocol.
To add the entry, you have to enable WinRM on the client. I did not want to enable WinRM on my laptop, but fortunately I discovered that stopping the service after adding the entry works. To add the entry:
|
|
This should work with an IP address instead of hostname, but I didn’t test. YMMV
Now test out that you can authenticate to and remotely run commands from your workstation by testing Invoke-Command:
|
|
It will prompt you for the local Administrator password and then remotely execute the hostname command:
If this works, you can now securely communicate between client and server and can finally start remotely managing Hyper-V.
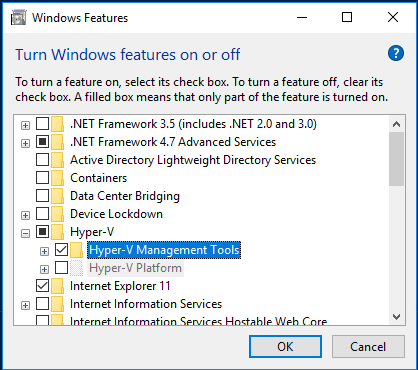
Configuring Hyper-V Manager
If you haven’t already, make sure to enable Hyper-V Management Tools in Windows Features to get the Hyper-V Manager GUI. You don’t have to actually enable the Hyper-V Platform (I don’t since I run Virtualbox locally).
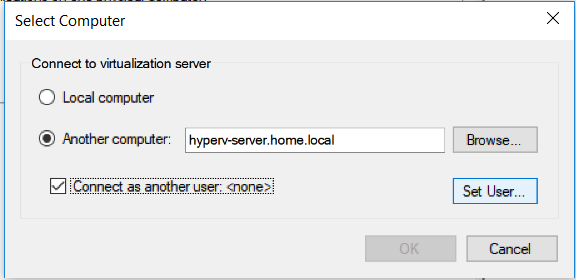
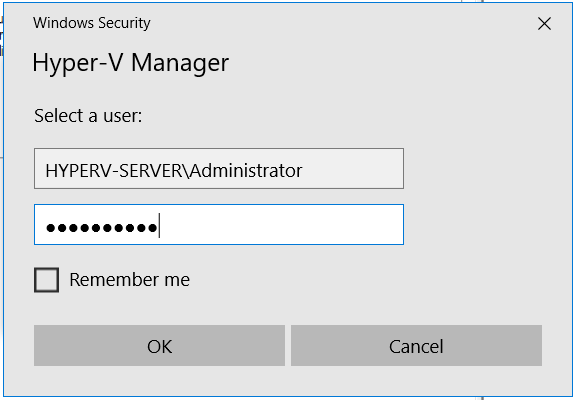
Open up Hyper-V Manager, right click and select “Connect to Server”. Enter the IP address or hostname of the Hyper-V server, and choose “Connect as another user”, entering the local Administrator credentials
Now…you’d think this would totally work. Especially since we’ve already proved that WinRM and PS-Remoting work just fine. But hit ‘OK’ and this error pops up:
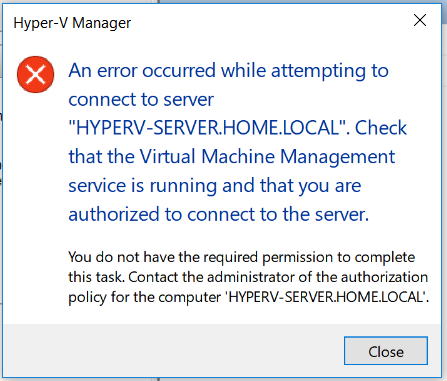
I have no idea why this is failing. This had me at a loss until I found a workaround.
Authorization Workaround
To get around the authorization error, you have to manually add the Hyper-V Server credential into memory using cmdkey. Exit out of Hyper-V server and enter the following at a command prompt on the client:
|
|
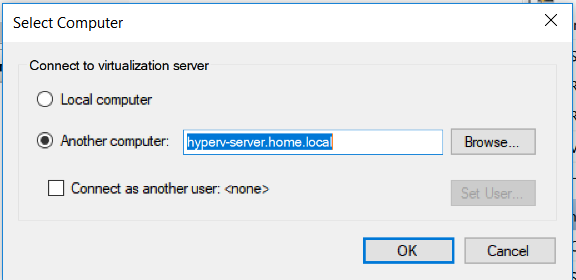
Now re-open Hyper-V Server and connect to the remote server again, but don’t bother specifying another user since the creds we need are already in memory:
This finally works! You can connect and remotely manage the server:

As long as the credential remains in memory, you can remotely manage the server. Another possible workaround is to start Hyper-V Manager with runas and the correct local account:
|
|
You could create a shortcut to run this and be good to go.
tl;dr
On Hyper-V Server
- Enable Remote Management
- Enable Remote Desktop
- Set Computername
- Enable WSMan and PS-Remoting:
|
|
On Managing Client
- Configure hosts or DNS entry for Hyper-V Server
- Ensure network profile is “Private”:
|
|
- Temporarily start WinRM and add Hyper-V Server as Trusted Host:
|
|
- Enable Hyper-V Management Tools in Windows Features
- Add Hyper-V Administrator credential with cmdkey:
|
|
- Launch Hyper-V Manager and connect to server (don’t specify user)
- or, launch Hyper-V Manager with
runas:
- or, launch Hyper-V Manager with
|
|
Summary
After lots of mucking around, this is the bare-minimum working configuration I’ve found to remotely manage a Hyper-V server in a non-domain environment.
I’m still not 100% certain why Hyper-V Manager does not work with supplied credentials and the cmdkey or runas workaround is necessary. If anyone can shed some light on that, I would appreciate it!
Hope this helps someone out there -ropnop