Intro
I have totally fallen down the Kubernetes rabbit hole and am really enjoying playing with it and attacking it. One thing I’ve noticed is although there are a lot of great resources to get up and running with it really quickly, there are far fewer that take the time to make sure it’s set up securely. And a lot of these tutorials and quick-start guides leave out important security options for the sake of simplicity.
In my opinion, one of the biggest offenders of this is Helm, the “package manager for Kubernetes”. There are countless tutorials and Stack Overflow answers that completely gloss over the security recommendations and take steps that really put the entire cluster at risk. More and more organizations I’ve talked to recently actually seem to be ditching the cluster side install of Helm (“Tiller”) entirely for security reasons, and I wanted to explore and explain why.
In this post, I’ll set up a default GKE cluster with Helm and Tiller, then walk through how an attacker who compromises a running pod could abuse the lack of security controls to completely take over the cluster and become full admin.
tl;dr
The “simple” way to install Helm requires cluster-admin privileges to be given to its pod, and then exposes a gRPC interface inside the cluster without any authentication. This endpoint allows any compromised pod to deploy arbitrary Kubernetes resources and escalate to full admin. I wrote a few Helm charts that can take advantage of this here: https://github.com/ropnop/pentest_charts
Disclaimer
This post in only meant to practically demonstrate the risks involved in not enabling the security features for Helm. These are not vulnerabilities in Helm or Tiller and I’m not disclosing anything previously unknown. My only hope is that by laying out practical attacks, people will think twice about configuring loose RBAC policies and not enabling mTLS for Tiller.
Installing the Environment
To demonstrate the attack, I’m going to set up a typical web stack on Kubernetes using Google Kubernetes Engine (GKE) and Helm. I’ll be installing everything using just the defaults as found on many write-ups on the internet. If you want to just get to the attacking part, feel free to skip this section and go directly to “Exploiting a Running Pod”
Set up GKE
I’ve createad a new GCP project and will be using the command line tool to spin up a new GKE cluster and gain access to it:
|
|
Now I’m ready to create the cluster and get credentials for it. I will do it with all the default options. There are a lot of command line switches that can help lock down this cluster, but I’m not going to provide any:
|
|
After a few minutes, my cluster is up and running:
Lastly, I get credentials and verify connectivity with kubectl:
|
|
And everything looks good, time to install Helm and Tiller
Installing Helm+Tiller
Helm has a quickstart guide to getting up and running with Helm quickly. This guide does mention that the default installation is not secure and should only be used for non-production or internal clusters. However, several other guides on the internet skip over this fact (example1, example2). And several Stack Overflow answers I’ve seen just have copy/paste code to install Tiller with no mention of security.
Again, I’ll be doing a default installation of Helm and Tiller, using the “easiest” method.
Creating the service account
Since Role Based Access Control (RBAC) is enabled by default now on every Kubernetes provider, the original way of using Helm and Tiller doesn’t work. The Tiller pod needs elevated permissions to talk the Kubernetes API. Fine grain controlling of service account permissions is tricky and often overlooked, so the “easiest” way to get up and running is to create a service account for Tiller with full cluster admin privileges.
To create a service account with cluster admin privs, I define a new ServiceAccount and ClusterRoleBinding in YAML:
|
|
and apply it with kubectl:
|
|
This created a service account called tiller, generated a secret auth token for it, and gave the account full cluster admin privileges.
Initialize Helm
The final step is to initialize Helm with the new service account. Again, there are additional flags that can be provided to this command that will help lock it down, but I’m just going with the “defaults”:
|
|
Besides setting up our client, this command also creates a deployment and service in the kube-system namespace for Tiller. The resources are tagged with the label app=helm, so you can filter and see everything running:
We can also see that the Tiller deployment is configured to use our cluster admin service account:
|
|
Installing Wordpress
Now it’s time to use Helm to install something. For this scenario, I’ll be installing a Wordpress stack from the official Helm repository. This is a pretty good example of how quick and powerful Helm can be. In one command we can get a full stack deployment of Wordpress including a persistent MySQL backend.
|
|
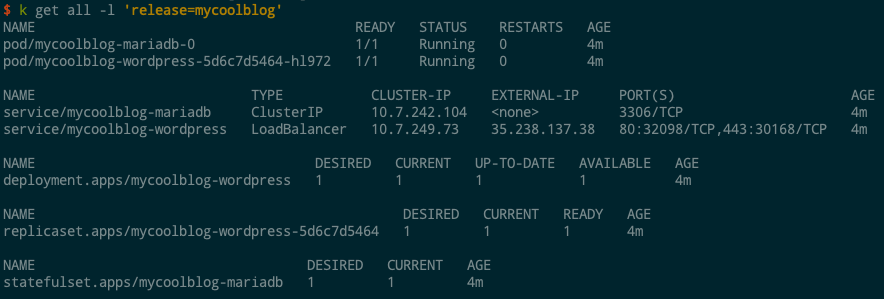
With no other flags, Tiller deploys all the resources into the default namespace. The “name” field gets applied as a release label on the resource, so we can view all the resources that were created:
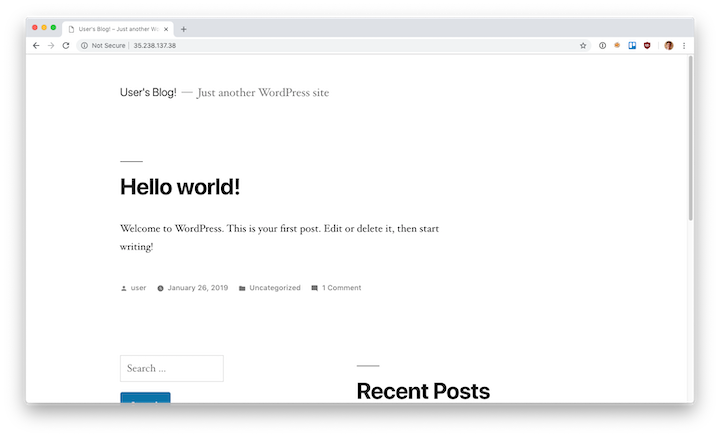
Helm took care of exposing the port for us too via a LoadBalancer service, so if we visit the external IP listed, we can see that Wordpress is indeed up and running:
And that’s it! I’ve got my blog up and running on Kubernetes in no time. What could go wrong now?
Exploiting a Running Pod
From here on out, I am going to assume that my Wordpress site has been totally compromised and an attacker has gained remote code execution on the underlying pod. This could be through a vulnerable plugin I installed or a bad misconfiguration, but let’s just assume an attacker got a shell.
Note: for purposes of this scenario I’m just giving myself a shell on the pod directly with the following command
|
|
Post Exploitation
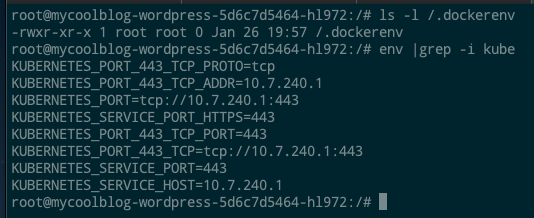
After landing a shell, theres a few indicators that quickly point to this being a container running on Kubernetes:
- The file
/.dockerenvexists - we’re inside a Docker container - Various kubernetes environment variables
There’s several good resources out there for various Kubernetes post-exploitation activities. I recommend carnal0wnage’s Kubernetes master post for a great round-up. Trying some of these techniques, though, we’ll discover that the default GKE install is still fairly locked down (and updated against recent CVEs). Even though we can talk to the Kubernetes API, for example, RBAC is enabled and we can’t get anything from it:
Time for some more reconaissance
Service Reconaissance
By default, Kubernetes makes service discovery within a cluster easy through kube-dns. Looking at /etc/resolv.conf we can see that this pod is configured to use kube-dns:
|
|
Our search domains tell us we’re in the default namespace (as well as inside a GKE project named ropnop-helm-testing).
DNS names in kube-dns follow the format: <svc_name>.<namespace>.svc.cluster.local. Through DNS, for example, we can look up our MariaDB service that Helm created:
|
|
(Note: I’m using getent since this pod didn’t have standard DNS tools installed - living off the land ftw :) )
Even though we’re in the default namespace, it’s important to remember that namespaces don’t provide any security. By default, there are no network policies that prevent cross-namespace communication. From this position, we can query services that are running in the kube-system namespace. For example, the kube-dns service itself:
|
|
Through DNS, it’s possible to enumerate running services in other namespaces. Remember how Tiller created a service in kube-system? Its default name is ‘tiller-deploy’. If we checked for that via a DNS lookup we’d see it exists and exactly where it’s at:
Great! Tiller is installed in this cluster. How can we abuse it?
Abusing tiller-deploy
The way that Helm talks with a kubernetes cluster is over gRPC to the tiller-deploy pod. The pod then talks to the Kubernetes API with its service account token. When a helm command is run from a client, under the hood a port forward is opened up into the cluster to talk directly to the tiller-deploy service, which always points to the tiller-deploy pod on TCP 44134.
What this means is that for a user outside the cluster, they must have the ability to open port forwards into the cluster since port 44134 is not externally exposed. However, from inside the cluster, 44134 is available and the port forward is not needed.
We can verify that the port is open by simply tryint to curl it:
Since we didn’t get a timeout, something is listening there. Curl fails though, since this endpoint is designed to talk gRPC, not HTTP.
Knowing we can reach the port, if we can send the right messages, we can talk directly to Tiller - since by default, Tiller does not require any authentication for gRPC communication. And since in this default install Tiller is running with cluster-admin privileges, we can essentially run cluster admin commands without any authentication.
Talking gRPC to Tiller
All of the gRPC endpoints are defined in the source code in Protobuf format, so anyone can create a client to communicate to the API. But the easiest way to communicate with Tiller is just through the normal Helm client, which is a static binary anyway.
On our compromised pod, we can download the helm binary from the official releases. To download and extract to /tmp:
|
|
Note: You may need to download specific versions to match up the version running in the server. You’ll see error messages telling you what version to get.
The helm binary allows us to specify a direct address to Tiller with --host or with the HELM_HOST environment variable. By plugging in the discovered tiller-deploy service’s FQDN, we can directly communicate with the Tiller pod and run arbitrary Helm commands. For example, we can see our previously installed Wordpress release!
From here, we have full control of Tiller. We can do anything a cluster admin could normally do with Helm, including installing/upgrading/deleting releases. But we still can’t “directly” talk to the Kubernetes API, so let’s abuse Tiller to upgrade our privileges and become full cluster admin.
Stealing secrets with Helm and Tiller
Tiller is configured with a service account that has cluster admin privileges. This means that the pod is using a secret, privileged service token to authenticate with the Kubernetes API. Service accounts are generally only used for “non-human” interactions with the k8s API, however anyone in possession of the secret token can still use it. If an attacker compromises Tiller’s service account token, he or she can execute any Kubernetes API call with full admin privileges.
Unfortunately, the Helm API doesn’t support direct querying of secrets or other resources. Using Helm, we can only create new releases from chart templates.
Chart templates are very well documented and allow us to template out custom resources to deploy to Kubernetes. So we just need to craft a resource in a way to exfiltrate the secret(s) we want.
Stealing a service account token
When the service account name is known, stealing its token is fairly straightforward. All that is needed is to launch a pod with that service account, then read the value from /var/run/secrets/kubernetes.io/serviceaccount/token, where the token value gets mounted at creation. It’s possible to just define a job to read the value and use curl to POST it to a listening URL:
|
|
Of course, since we don’t hace access to the Kubernetes API directly and are using Helm, we can’t just send this YAML - we have to send a Chart.
I’ve created a chart to run the above job:
https://github.com/ropnop/pentest_charts/tree/master/charts/exfil_sa_token
This chart is also packaged up and served from a Chart Repo here: https://ropnop.github.io/pentest_charts/
This Chart takes a few values:
name- the name of the release, job and pod. Probably best to call it something benign looking (e.g. “tiller-deployer”)serviceAccountName- the service account to use (and therefore the token that will be exfil’d)exfilURL- the URL to POST the token to. Make sure you have a listener on that URL to catch it! (I like using a serverless function to dump to Slack)namespace- defaults to kube-system, but you can override it
To deploy this chart and exfil the tiller service account token, we have to first “initialize” Helm in our pod:
|
|
Once it initializes, we can deploy the chart directly and pass it the values via command line:
|
|
Our Job was successfully deployed:
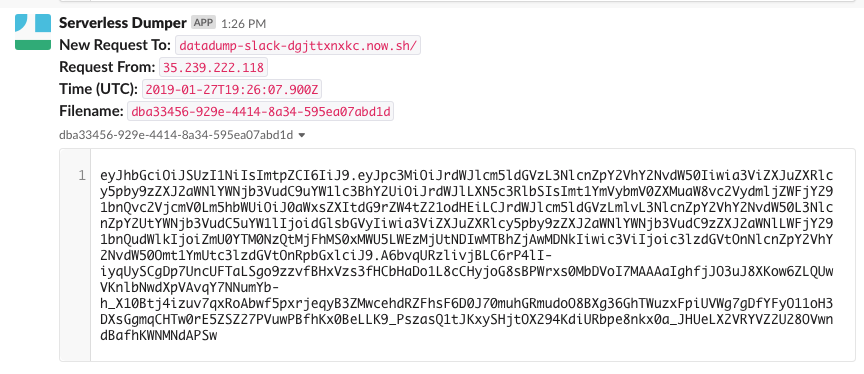
And I got the tiller service account token POSTed back to me in Slack :)
After the job completes, it’s easy to clean up everything and delete all the resources with Helm purge:
|
|
Stealing all secrets from Kubernetes
While you can always use the “exfil_sa_token” chart to steal service account tokens, it’s predicated on one thing: you know the name of the service account.
In the above case, an attacker would have to pretty much guess that the service account name was “tiller”, or the attack wouldn’t work. In this scenario, since we don’t have access to the Kubernetes API to query service accounts, and we can’t look it up through Tiller, there’s no easy way to just pull out a service account token if it has a unique name.
The other option we have though, is to use Helm to create a new, highly privileged service account, and then use that to extract all the other Kubnernetes secrets. To accomplish that, we create a new ServiceAccount and ClusterRoleBinding then attach it to a new job that extracts all Kubernetes secrets via the API. The YAML definitions to do that would look something like this:
|
|
In the same vein as above, I packaged the above resources into a Helm chart:
https://github.com/ropnop/pentest_charts/tree/master/charts/exfil_secrets
This Chart also takes the same values:
name- the name of the release, job and pod. Probably best to call it something benign looking (e.g. “tiller-deployer”)serviceAccountName- the name of the cluster-admin service account to create and use (again, use something innocuous looking)exfilURL- the URL to POST the token to. Make sure you have a listener on that URL to catch it! (I like using a serverless function to dump to Slack)namespace- defaults to kube-system, but you can override it
When this chart is installed, it will create a new cluster-admin service account, then launch a job using that service account to query for every secret in all namespaces, and dump that data in a POST body back to EXFIL_URL.
Just like above, we can launch this from our compromised pod:
|
|
After Helm installs the chart, we’ll get every Kubernetes secret dumped back to our exfil URL (in my case posted in Slack)
And then make sure to clean up and remove the new service account and job:
|
|
With the secrets in JSON form, you can use jq to extract out plaintext passwords, tokens and certificates:
|
|
And searching through that you can find the service account token tiller uses:
Using service account tokens
Now armed with Tiller’s service account token, we can finally directly talk to the Kubernetes API from within our compromised pod. The token value needs to be added as a header in the request: Authorization: Bearer <token_here>
|
|
Working from within the cluster is annoying though, since it is always going to require us to execute commands from our compromised pod. Since this is a GKE cluster, we should be able to access the Kubernetes API over the internet if we find the correct endpoint.
For GKE, you can pull data about the Kubernetes cluster (including the master endpoint) from the Google Cloud Metadata API from the compromised pod:
|
|
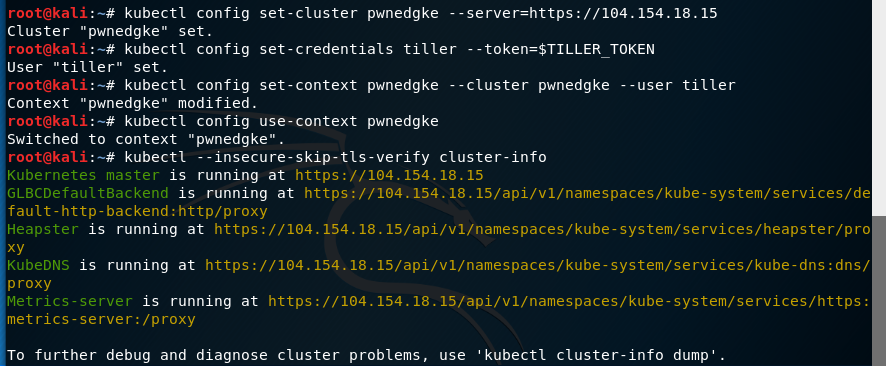
Armed with the IP address and Tiller’s token, you can then configure kubectl from anywhere to talk to the GKE cluster on that endpoint:
|
|
Note: I’m skipping TLS verify because I didn’t configure the cluster certificate
For example, let’s take over the GKE cluster from Kali:
And that’s it - we have full admin control over this GKE cluster :)
There is a ton more we can do to maintain persistence (especially after dumping all the secrets previously), but that will remain a topic for future posts.
Defenses
This entire scenario was created to demonstrate how the “default” installation of Helm and Tiller (as well as GKE) can make it really easy for an attacker to escalate privileges and take over the entire cluster if a pod is compromised.
If you are considering using Helm and Tiller in production, I strongly recommend following everything outlined here:
https://github.com/helm/helm/blob/master/docs/securing_installation.md
mTLS should be configured for Tiller, and RBAC should be as locked down as possible. Or don’t create a Tiller service and require admins to do manual port forwards to the pod.
Or ask yourself if you really need Tiller at all - I have seen more and more organizations simply abandon Tiller all together and just use Helm client-side for templating.
For GKE, Google has a good writeup as well on securing a cluster for production:
https://cloud.google.com/solutions/prep-kubernetes-engine-for-prod.
Using VPCs, locking down access, filtering metadata, and enforcing network policies should be done at a minimum.
Sadly, a lot of these security controls are hard to implement, and require a lot more effort and research to get right. It’s not surprising to me then that a lot of default installations still make their way to production.
Hope this helps someone! Let me know if you have any questions or want me to focus on anything more in the future. I’m hoping this is just the first of several Kubernetes related posts.
-ropnop


